Настройка виртуального UART/en — различия между версиями
(Новая страница: «<p>1. Open the connection settings and change Mode c Normal to Virtual UART. </p> 600px») |
(Новая страница: «<p>2. Save changes </p> <p> After saving, you will see that the specified connection is disabled due to Virtual UART. This means that WebHMI will not work with it…») |
||
| Строка 8: | Строка 8: | ||
[[Файл:Vitrual_uart_1.png|600px]] | [[Файл:Vitrual_uart_1.png|600px]] | ||
| − | <p>2. | + | <p>2. Save changes </p> |
| − | <p> | + | <p> After saving, you will see that the specified connection is disabled due to Virtual UART. This means that WebHMI will not work with it until Virtual UART mode is enabled. If this UART is used for other PLCs, they will also be disabled and WebHMI will not be able to work with them. </ P> |
| − | <p> | + | <p> Also in the list of connections you will see the column Virtual UART. It shows the TCP port number of this UART by which to connect. |
| + | </p> | ||
[[Файл:Vitrual_uart_2.png|600px]] | [[Файл:Vitrual_uart_2.png|600px]] | ||
Версия 09:49, 19 октября 2017
Sometimes there is a need to access a remote PLC or other equipment with an RS-485 or RS-232 interface. To solve this problem, you can use the Virtual UART function which is built into WebHMI.
Suppose that we need to update the program in the controller Delta DVP-10SX. It is connected to WebHMI using RS-485.
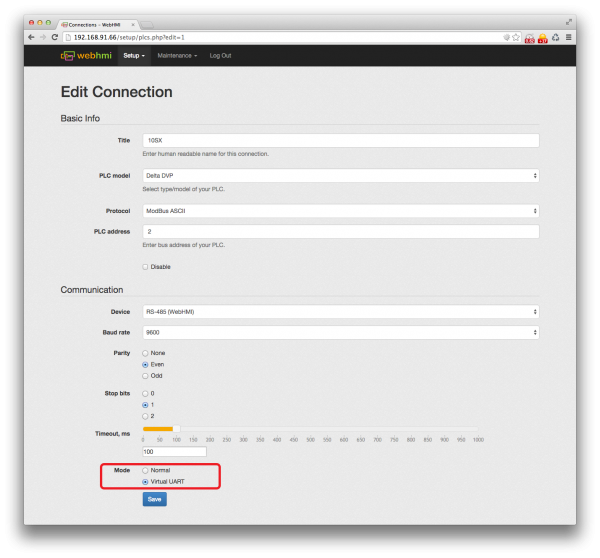
1. Open the connection settings and change Mode c Normal to Virtual UART.
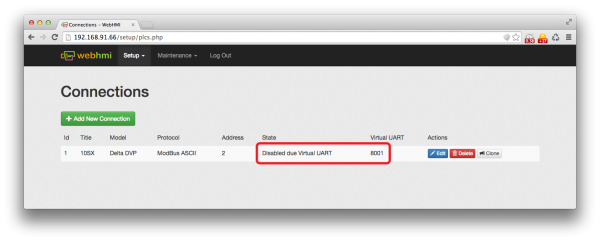
2. Save changes
After saving, you will see that the specified connection is disabled due to Virtual UART. This means that WebHMI will not work with it until Virtual UART mode is enabled. If this UART is used for other PLCs, they will also be disabled and WebHMI will not be able to work with them. </ P> <p> Also in the list of connections you will see the column Virtual UART. It shows the TCP port number of this UART by which to connect.
3. Загрузите и установите драйвер [Perle TruePort] для вашей операционной системы.
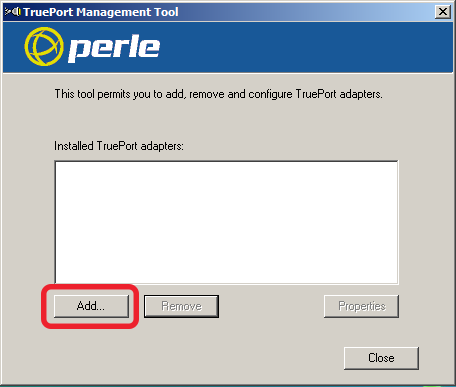
4. Запустите TruePort Management Tool. Нажмите "Add..." для добавления нового виртуального порта.
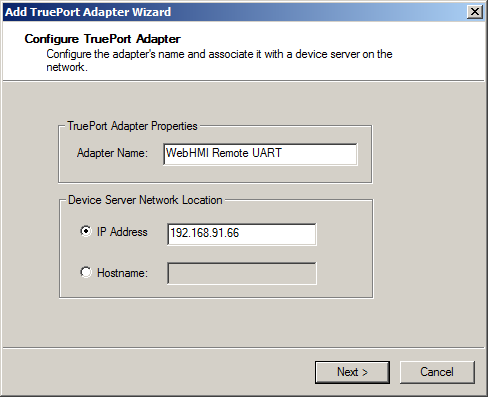
5. Укажите удобное название для виртуального порта и IP-адрес WebHMI. Нажмите "Next".
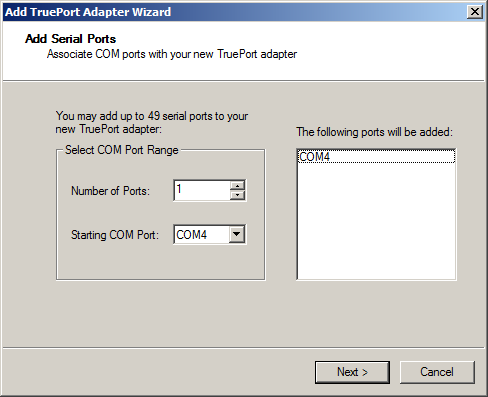
6. Укажите какое количество виртуальных портов вы хотите создать и стартовый адрес для них. Нажмите "Next".
WebHMI позволяет создать множество виртуальных портов. Для подключения дополнительных UART необходимо использовать внешний USB-хаб и USB-RS485 или USB-RS232 преобразователи.
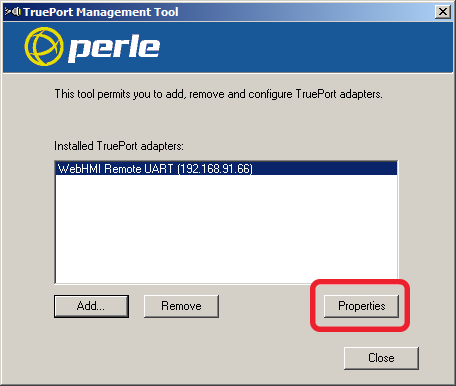
7. Выберите только что созданный порт и нажмите кнопку "Properties".
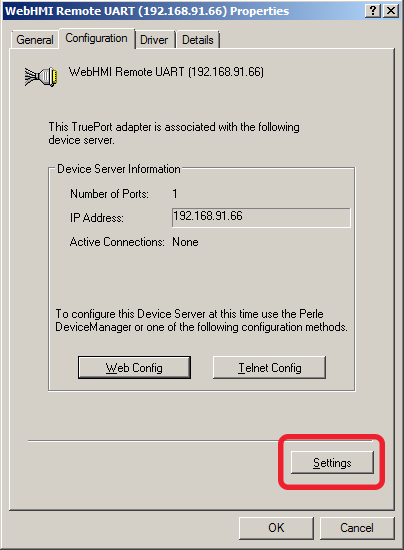
8. Откройте вкладку "Configuration" и нажмите кнопку "Settings".
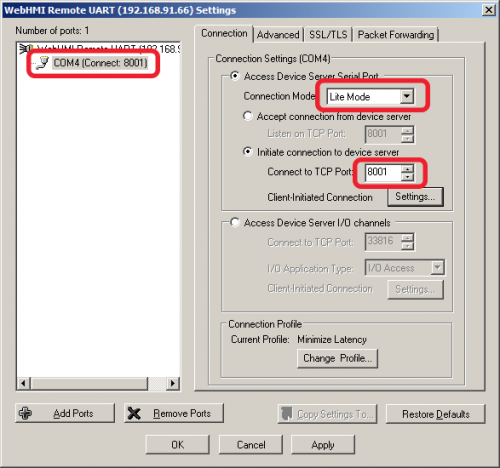
9. В окне настроек портов выберите нужный порт в списке слева. Справа выберите "Initiate connection to device server" и укажите порт, который вы увидели на шаге 2. В нашем случае это 8001. Нажмите "OK", затем "Close".
Если вы все сделали правильно то теперь у вас в системе появился виртуальный COM-порт COM4 который можно использовать в любом приложении для доступа к ПЛК.
Обратите внимание что все настройки самого порта указываются в "Connections" WebHMI. Все настройки (скорость, четность, стоп биты), указанные в Windows-приложениях будут проигнорированы.
