Настройка сетевых соединений/en — различия между версиями
(Новая страница: «The opened window 'Wireless Overview' shows the main parameters of existing wireless networks. From here you can manage them: add / remove, enable / disable, and…») |
|||
| (не показано 46 промежуточных версий 2 участников) | |||
| Строка 4: | Строка 4: | ||
WEBHMI has 2 RJ45 network connectors labeled LAN and WAN. By default, the LAN is configured as [https://en.wikipedia.org/wiki/DHCP DHCP] -server that automatically distributes network settings to the connected devices, and WAN as a DHCP client focused on connecting to a network that already has a A DHCP server, for example, a router distributing the Internet. In addition, the settings [http://wiki.webhmi.com.ua/index.php/%D0%9D%D0%B0%D1%81%D1%82%D1%80%D0%BE%D0%B9%D0%BA%D0%B0_%D1%81%D0%B5%D1%82%D0%B5%D0%B2%D1%8B%D1%85_%D1%81%D0%BE%D0%B5%D0%B4%D0%B8%D0%BD%D0%B5%D0%BD%D0%B8%D0%B9#.D0.9C.D0.B5.D0.B6.D1.81.D0.B5.D1.82.D0.B5.D0.B2.D0.BE.D0.B9_.D1.8D.D0.BA.D1.80.D0.B0.D0.BD_.28Firewall.29 Firewall] forbids all incoming connectoins from WAN network, and therefore access to WebHMI's web-interface is possible only from LAN. [http://wiki.webhmi.com.ua/index.php/%D0%9F%D0%B5%D1%80%D0%B2%D0%BE%D0%B5_%D0%B2%D0%BA%D0%BB%D1%8E%D1%87%D0%B5%D0%BD%D0%B8%D0%B5]. You can change the current settings using the '''Network setup''' section, which you can access via the link on the authorization page or from the '' Setup / Network setup '' menu after logging in <br> | WEBHMI has 2 RJ45 network connectors labeled LAN and WAN. By default, the LAN is configured as [https://en.wikipedia.org/wiki/DHCP DHCP] -server that automatically distributes network settings to the connected devices, and WAN as a DHCP client focused on connecting to a network that already has a A DHCP server, for example, a router distributing the Internet. In addition, the settings [http://wiki.webhmi.com.ua/index.php/%D0%9D%D0%B0%D1%81%D1%82%D1%80%D0%BE%D0%B9%D0%BA%D0%B0_%D1%81%D0%B5%D1%82%D0%B5%D0%B2%D1%8B%D1%85_%D1%81%D0%BE%D0%B5%D0%B4%D0%B8%D0%BD%D0%B5%D0%BD%D0%B8%D0%B9#.D0.9C.D0.B5.D0.B6.D1.81.D0.B5.D1.82.D0.B5.D0.B2.D0.BE.D0.B9_.D1.8D.D0.BA.D1.80.D0.B0.D0.BD_.28Firewall.29 Firewall] forbids all incoming connectoins from WAN network, and therefore access to WebHMI's web-interface is possible only from LAN. [http://wiki.webhmi.com.ua/index.php/%D0%9F%D0%B5%D1%80%D0%B2%D0%BE%D0%B5_%D0%B2%D0%BA%D0%BB%D1%8E%D1%87%D0%B5%D0%BD%D0%B8%D0%B5]. You can change the current settings using the '''Network setup''' section, which you can access via the link on the authorization page or from the '' Setup / Network setup '' menu after logging in <br> | ||
| − | [[Файл: | + | [[Файл:Enter to netSetup.png|600px]]<br> |
Login to the network settings section requires authorization. Default requisites are '''Login: admin / Password: webhmi''' | Login to the network settings section requires authorization. Default requisites are '''Login: admin / Password: webhmi''' | ||
| Строка 67: | Строка 67: | ||
=== General information === | === General information === | ||
The WebHMI firewall 'maps' one or more networks / interfaces in special zones, which are used to describe the default rules for this interface, the rules for forwarding packets between interfaces, and additional rules that do not fall under the first two types. All traffic for the network interface can be classified as incoming, outgoing, or redirected. In the firewall's network settings menu, for convenience, descriptions and comments to all its fields are provided. | The WebHMI firewall 'maps' one or more networks / interfaces in special zones, which are used to describe the default rules for this interface, the rules for forwarding packets between interfaces, and additional rules that do not fall under the first two types. All traffic for the network interface can be classified as incoming, outgoing, or redirected. In the firewall's network settings menu, for convenience, descriptions and comments to all its fields are provided. | ||
| − | [[Файл:FireWall.png | 500px | left]] <br> | + | [[Файл:FireWall eng.png| 500px | left]] <br> |
<br clear = all> In the operating system configuration file, the default firewall rules goes first, but they take effect last. The filtering system uses sequential processing, in which the packets are processed sequentially, in a chain, by different rules. The first matching rule is executed, but it often performs a transition to another chain of rules that the packet is moving on until it meets ACCEPT (accept) or DROP / REJECT (discard) commands. Rules with such commands are executed last in the chain of rules, so the default rules will come into effect last, and more specific rules will be checked first. Zones are used to configure masquerading, also known as NAT, as well as for configuring port forwarding rules, more commonly known as redirection. | <br clear = all> In the operating system configuration file, the default firewall rules goes first, but they take effect last. The filtering system uses sequential processing, in which the packets are processed sequentially, in a chain, by different rules. The first matching rule is executed, but it often performs a transition to another chain of rules that the packet is moving on until it meets ACCEPT (accept) or DROP / REJECT (discard) commands. Rules with such commands are executed last in the chain of rules, so the default rules will come into effect last, and more specific rules will be checked first. Zones are used to configure masquerading, also known as NAT, as well as for configuring port forwarding rules, more commonly known as redirection. | ||
| Строка 74: | Строка 74: | ||
In the factory configuration of WebHMI, two zones are configured with their own rules, which are sufficient for working in 99% of the cases - the wan zone (in which the Internet gateway is usually located) prohibits incoming traffic, but allows redirection from the lan zone to wan. | In the factory configuration of WebHMI, two zones are configured with their own rules, which are sufficient for working in 99% of the cases - the wan zone (in which the Internet gateway is usually located) prohibits incoming traffic, but allows redirection from the lan zone to wan. | ||
The names of the zones lan (green) and wan (red) by default coincide with the names of the network interfaces LAN and WAN to which they are assigned, however, the zones can be called arbitrary: | The names of the zones lan (green) and wan (red) by default coincide with the names of the network interfaces LAN and WAN to which they are assigned, however, the zones can be called arbitrary: | ||
| − | [[Файл:If firewall | + | [[Файл:If firewall tabEng.png | 1024px | left]] |
<br clear = all> | <br clear = all> | ||
Here, the names of the wan and wlim zones differ from the names of the WWAN and WFONLY networks, respectively. | Here, the names of the wan and wlim zones differ from the names of the WWAN and WFONLY networks, respectively. | ||
| Строка 80: | Строка 80: | ||
=== Zone edit === | === Zone edit === | ||
You can create and edit firewall zones in the ''' Network / Firewall ''' menu. | You can create and edit firewall zones in the ''' Network / Firewall ''' menu. | ||
| − | [[ Файл: | + | [[ Файл:FireWall 1.png | left | 1024px]] |
<br clear = all> | <br clear = all> | ||
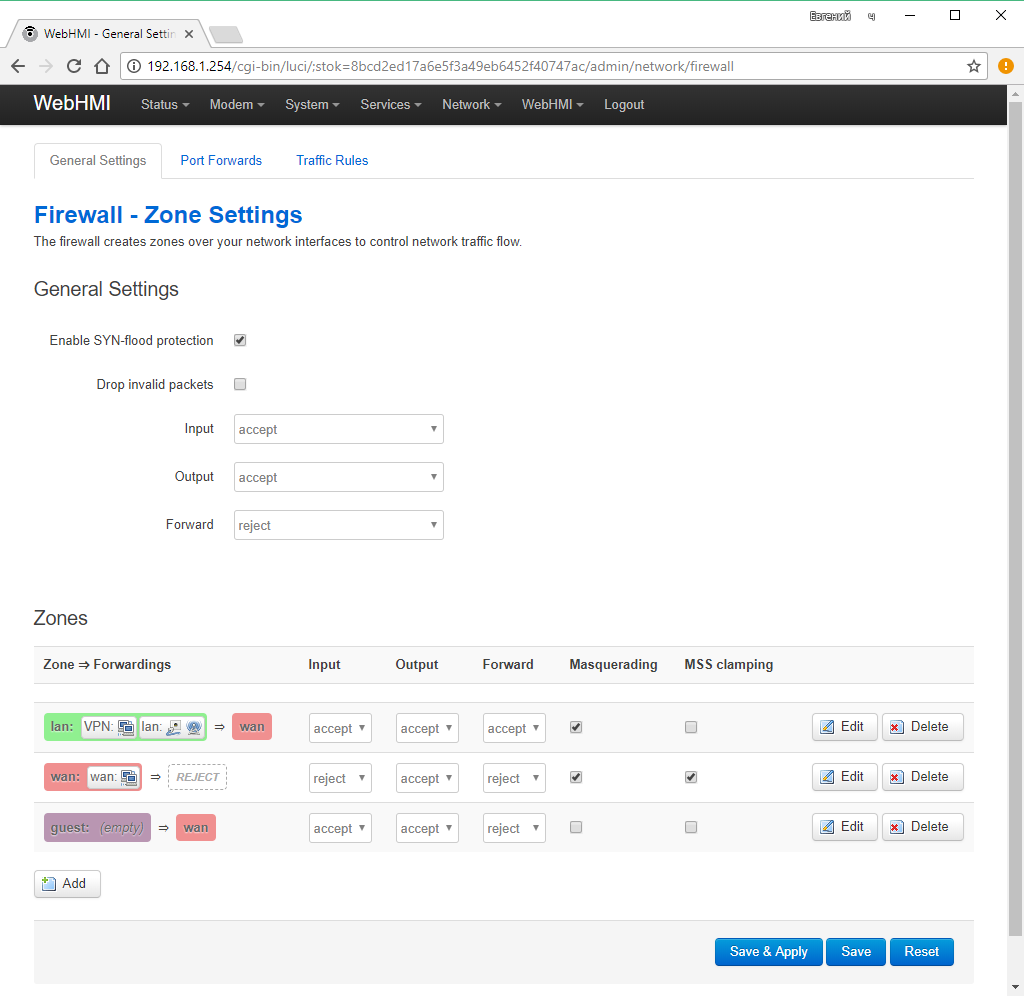
The key properties of the zones are displayed on this page in a separate list. In this example: | The key properties of the zones are displayed on this page in a separate list. In this example: | ||
| Строка 89: | Строка 89: | ||
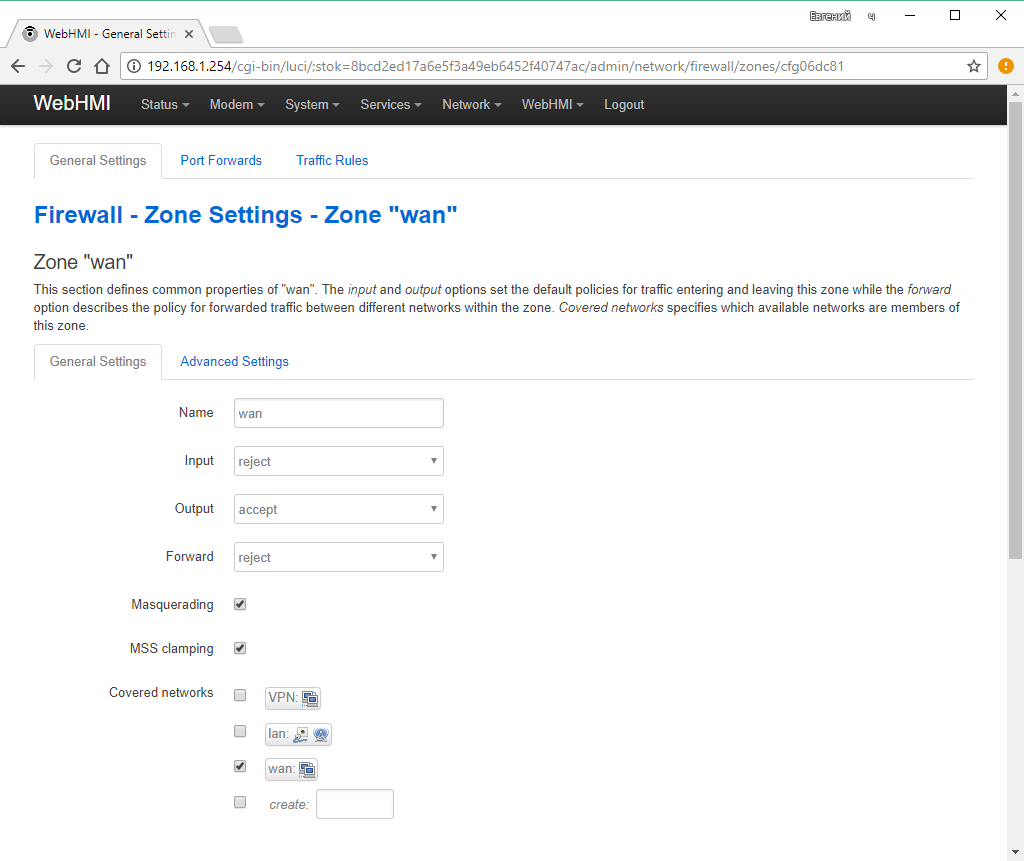
Edit Zone Menu: | Edit Zone Menu: | ||
| − | [[Файл: | + | [[Файл:FireWall zone p1.png | left | 1024px]] |
<br clear = all> | <br clear = all> | ||
I.e. you can link networks to zones both when editing interfaces and when editing zones. | I.e. you can link networks to zones both when editing interfaces and when editing zones. | ||
| − | [[Файл: | + | [[Файл:FireWall zone p2.png| left | 1024px]] |
<br clear = all> | <br clear = all> | ||
The redirection method can be only one for each zone (ie, the rule works in only one way) - i.e. If you want to allow mutual redirection between two zones, you need to describe the 2 rules in individual zones. <br> | The redirection method can be only one for each zone (ie, the rule works in only one way) - i.e. If you want to allow mutual redirection between two zones, you need to describe the 2 rules in individual zones. <br> | ||
| Строка 98: | Строка 98: | ||
=== Default rules === | === Default rules === | ||
There is a separate list for the rules for port forwarding (DNAT): | There is a separate list for the rules for port forwarding (DNAT): | ||
| − | [[ Файл: | + | [[ Файл:FireWall zone p2.png | left | 1024px]] |
<br clear = all> | <br clear = all> | ||
The list of general default rules (used if the special rules described above have not been fulfilled) is in the ''' Rules for traffic ''' tab. Here you can add and edit them, change the order of application in the chain of rules. | The list of general default rules (used if the special rules described above have not been fulfilled) is in the ''' Rules for traffic ''' tab. Here you can add and edit them, change the order of application in the chain of rules. | ||
| − | [[ Файл: | + | [[ Файл:Traffic rules.png| left | 1024px]] |
<br clear = all> | <br clear = all> | ||
| − | [[Файл: | + | [[Файл:Traffic rules2.png | left | 1024px]] |
<br clear = all> | <br clear = all> | ||
| Строка 139: | Строка 139: | ||
[[Файл:wifi_001.png|500px]] <br> | [[Файл:wifi_001.png|500px]] <br> | ||
| − | The opened window 'Wireless Overview' shows the main parameters of existing wireless networks. From here you can manage them: add / remove, enable / disable, and change their settings <br> | + | The opened window '''Wireless Overview''' shows the main parameters of existing wireless networks. From here you can manage them: add / remove, enable / disable, and change their settings <br> |
[[Файл:wifi_002.png|600px]] <br> | [[Файл:wifi_002.png|600px]] <br> | ||
| − | + | To change the settings of an existing network, click '''Edit'''. Here, all the parameters are divided into two groups: the physical settings that determine the parameters of the radio channel, which in most cases can be left untouched and logical, which determine, in fact, the properties of the wireless network - its identifier, mode of operation and security parameters.<br> | |
| − | <font color="red">''' | + | <font color="red">'''ATTENTION! If you are connected to WebHMI via Wi-Fi, manipulation of wireless network settings may result in communication failure.'''</font><br> |
| − | '''Interface configuration''', | + | '''Interface configuration''', '''General setup''' tab: |
| − | 1. '''ESSID''' – | + | 1. '''ESSID''' – wireless network name <br> |
| − | 2. '''Mode''' – | + | 2. '''Mode''' – work mode. In most cases, it will either be an 'Access point' when creating a new wireless network, or ''' Client ''' - when connecting to an existing network. |
| − | 3. '''Network''' | + | 3. '''Network'' '- defines the physical binding of this network to a new another already existing network (connecting a bridge type), or creating a new interface for it<br> |
| − | <font color="orange"> | + | <font color="orange">TIP. If you are not supposed to connect guest devices to this wireless network, you can hide it using the '''Hide ESSID'''</font><br> |
[[Файл:wifi_003.png|600px]] | [[Файл:wifi_003.png|600px]] | ||
| − | + | The 'Wireless Security' tab defines the security settings for the wireless network. | |
| − | <font color="orange"> | + | <font color="orange">TIP. To limit access to wireless networks, use more advanced technology [https://ru.wikipedia.org/wiki/WPA WPA2-PSK]. </font><br> |
| − | 4. '''Encryption''' - | + | 4. '''Encryption''' - Select the type of encryption or leave the network open<br> |
| − | 5. '''Key''' – | + | 5. '''Key''' – Come up with a security key (from 8 to 63 characters) <br> |
| − | 6. | + | 6. Save changes '''Save & Apply''' <br> |
[[Файл:wifi_004.png|600px]] | [[Файл:wifi_004.png|600px]] | ||
| − | + | Similarly, you could create a new wireless network. | |
| − | ''' | + | '''However, this is not the end'''. As a result of the manipulations, only a new network interface has been created so far (like the device, the network adapter), which appears in the list of networks in the tab ''' Interfaces''', the menu '''Network'''. Now it will need to be configured to work in the IP network (assign an address, gateway, etc.) similarly to described earlier [http://wiki.webhmi.com.ua/index.php/%D0%9D%D0%B0%D1%81%D1%82%D1%80%D0%BE%D0%B9%D0%BA%D0%B0_%D1%81%D0%B5%D1%82%D0%B5%D0%B2%D1%8B%D1%85_%D1%81%D0%BE%D0%B5%D0%B4%D0%B8%D0%BD%D0%B5%D0%BD%D0%B8%D0%B9#.D0.98.D0.BD.D1.82.D0.B5.D1.80.D1.84.D0.B5.D0.B9.D1.81.D1.8B_ LAN and WAN interface settings] <br> |
| − | <font color="orange"> | + | <font color="orange">TIP. Typically, the 'Access Point' mode of operation assumes that there is a DHCP server in the network that distributes network settings to the connected clients. If necessary, enable this option when configuring the interface.</font><br> |
| Строка 180: | Строка 180: | ||
| − | ''' | + | '''Connect to an existing network (Client mode)''' |
| − | 1. | + | 1. Press '''Scan''' in '''Wireless Overview''' window, '''Network / Wi-Fi''' menu <br> |
[[Файл:wifi_005.png|600px]] | [[Файл:wifi_005.png|600px]] | ||
| − | + | WebHMI will show the list of found networks.<br> | |
| − | 2. | + | 2. Press '''Join Network''' for the network you're going to connect to.<br> |
[[Файл:wifi_006.png|600px]] | [[Файл:wifi_006.png|600px]] | ||
| − | + | In the appeared window:<br> | |
| − | 3. | + | 3. Enter the network security key to which you are connecting <br> |
| − | 4. | + | 4. Specify the name of the network (how it will be displayed in the system). Note the '''Replace wireless configuration''' option, at the top of the screen. If it is selected, the new wireless network will replace the existing one, if not, then a new network will be created.<br> |
| − | 5. | + | 5.Based on the level of trust in the network, specify the desired network zone that defines the traffic processing rules for this connection. For details, see the[http://wiki.webhmi.com.ua/index.php/%D0%9D%D0%B0%D1%81%D1%82%D1%80%D0%BE%D0%B9%D0%BA%D0%B0_%D1%81%D0%B5%D1%82%D0%B5%D0%B2%D1%8B%D1%85_%D1%81%D0%BE%D0%B5%D0%B4%D0%B8%D0%BD%D0%B5%D0%BD%D0%B8%D0%B9#.D0.9C.D0.B5.D0.B6.D1.81.D0.B5.D1.82.D0.B5.D0.B2.D0.BE.D0.B9_ Firewall] <br> |
[[Файл:wifi_007.png|600px]] | [[Файл:wifi_007.png|600px]] | ||
| − | 6. | + | 6.In the window that appears, click '''Save & Apply'''. Most part is finished now.<br> |
[[Файл:wifi_009.png|600px]] | [[Файл:wifi_009.png|600px]] | ||
| − | + | In the '''Wireless Overview''' window, you will see a new wireless network (in this case there are two of them: one has a WebHMI client and the other has an access point). | |
[[Файл:wifi_010.png|600px]] | [[Файл:wifi_010.png|600px]] | ||
| − | + | You can see or change the settings of the network connection in the same place, in the tab ''' Network / Interfaces' '' | |
[[Файл:wifi_011.png|600px]] | [[Файл:wifi_011.png|600px]] | ||
| − | == | + | == Connecting WebHMI to the Internet == |
| − | + | A common task is to configure WebHMI with simultaneous access to the Internet as WebHMI, and the computer from which to configure. | |
| − | + | Let's consider several connection scenarios.<br> <br> | |
| − | ''' | + | '''Option 1. The computer and WebHMI connect to one external wireless network with the Internet.''' |
<p> | <p> | ||
| − | WebHMI | + | WebHMI with factory settings has only one WiFi connection - 'access point'. Therefore, the first step should be to connect it to the wireless network by the 'client' (for example we will call this WebHMI-DDS network). You can configure the WebHMI itself either over Ethernet (см. [http://wiki.webhmi.com.ua/index.php/%D0%9F%D0%B5%D1%80%D0%B2%D0%BE%D0%B5_%D0%B2%D0%BA%D0%BB%D1%8E%D1%87%D0%B5%D0%BD%D0%B8%D0%B5 here]), and connecting to its WiFi network 'master'. |
| − | + | In the latter case, you need to specify the option to add a new wireless network without replacing the existing one, otherwise after the new WiFi network of the 'client' is switched on, the network 'access point' through which the computer or laptop is connected will be lost. For more on this,[http://wiki.webhmi.com.ua/index.php/%D0%9D%D0%B0%D1%81%D1%82%D1%80%D0%BE%D0%B9%D0%BA%D0%B0_%D1%81%D0%B5%D1%82%D0%B5%D0%B2%D1%8B%D1%85_%D1%81%D0%BE%D0%B5%D0%B4%D0%B8%D0%BD%D0%B5%D0%BD%D0%B8%D0%B9#Wi-Fi here]. Then, after WebHMI is connected to the WebHMI-DDS network as a 'client', remember the IP address of the wireless network it has received. | |
| − | + | For example, in the following figure, WebHMI received an IP address of 192.168.1.203. Now you can disconnect the computer from WebHMI and connect to the WebHMI-DDS wireless network. To enter WebHMI, you must this address. </p> | |
[[Файл:Новая сеть есть в списке.png|800px]]<br> | [[Файл:Новая сеть есть в списке.png|800px]]<br> | ||
| − | + | Now both the computer and WebHMI have Internet access, and you can access the web interface from a computer from a common wireless network. | |
| − | <p>''' | + | <p>'''Option 2. WebHMI is connected to the Internet, a computer (laptop) is connected to the Internet through it''' </p> |
<p> | <p> | ||
| − | + | Sometimes, working with WebHMI, it can be convenient to connect to it for configuration and use it as a gateway to Internet access. | |
| − | + | You can basically connect a computer (already connected to the Internet via a wireless network) with an Ethernet patch cord to WebHMI, and it in turn to the Internet via a wireless network, but depending on the current network settings and the operating system of the computer, you may have to deal with additional TCP / IP on a computer or WebHMI (usually only one primary gateway can be allowed on the computer, whereas if you simultaneously connect a computer with a statically configured gateway on one network adapter and are received by DHC P on the other - there may be a problem with access to the Internet). | |
| − | + | The WebHMI factory setting allows you to make this connection simple. Internet connection on WebHMI should be (and is by default) in the zone of the WAN firewall - i.e. The Ethernet cable with the Internet should be connected to the WAN port (eth1 interface in the network settings) or the client interface of the wireless network with the Internet (or 3G modem, if it is used for Internet access) must also be in the WAN zone. By default, only this zone is configured with the masquerading function, which provides the correct address conversion when redirecting packets. The computer needs to be connected through one connection - to the interface of the LAN zone (Ethernet LAN port) or the wireless network 'master' included in the same zone by default. | |
</p> | </p> | ||
| − | + | Thus, when using the factory settings, a computer connected to a WebHMI configuration that has Internet access will also have Internet access. | |
| − | == | + | == Wireless 3G Internet == |
| − | + | If there is no wired connection to the Internet, you can connect WebHMI using a USB modem. | |
<ul> | <ul> | ||
| − | <li>[[ | + | <li>[[Connection to People.net]] |
| − | <li>[[ | + | <li>[[Connection МТС Коннект]] |
</ul> | </ul> | ||
== VPN == | == VPN == | ||
| − | + | In cases where remote access to WebHMI devices is required, you can use the VPN technology. | |
| − | + | The VPN access service is provided within the <a href="http://level2.webhmi.com.ua">Level2 system </a>. | |
{{#evt: | {{#evt: | ||
| Строка 246: | Строка 246: | ||
}} | }} | ||
| − | 0. ''' | + | 0. '''Make sure WebHMI is configured to access the Internet.''' You can use the tools on the Network Setup-> Network-> Diagnostics page to verify it. Packets must go well, DNS should work correctly. |
| − | 1. | + | 1. Go to Network Setup -> Network -> Interfaces. Press "Add new interface..." button.<br> |
[[Файл:3g_1.png|600px]] | [[Файл:3g_1.png|600px]] | ||
| − | 2. | + | 2. Enter the VPN as the connection name. This name is used in the watchdog script, which checks the connection status and can automatically reconnect this interface. So for the interface name 'VPN' is preferrable. |
| − | 2. | + | 2. Select the L2TPv2 protocol and click 'Apply'. |
| − | 3. | + | 3. On the General Setup tab, specify the following parameters: |
L2TP Server: <strong>webhmicloud.com</strong><br> | L2TP Server: <strong>webhmicloud.com</strong><br> | ||
| − | PAP/CHAP username: <strong>[ | + | PAP/CHAP username: <strong>[the password from the "Information" tab for this node in Level2]</strong><br> |
| − | PAP/CHAP password: <strong>[ | + | PAP/CHAP password: <strong>[the password from the "Information" tab for this node in Level2]</strong> |
| − | 4. | + | 4. Go to the 'Advanced Settings' tab and enter the number 15 or whatever in the Default gateway metric field. It is important that the Default gateway metric of the VPN interface has more than the Default gateway metric at the interface on which the connection to the Internet is going. |
| − | 5. | + | 5. On the 'Firewall Settings' tab, assign a lan zone for this interface to allow incoming connections. If this is not done then the firewall will not allow incoming connections on the VPN and will not get access to the device from the outside. |
| − | + | Enable VPN Monitoring on the Network-> VPN Monitoring page to automatically restart the VPN connection in case of communication problems. | |
| − | == | + | == Auto recover function for 3G and VPN == |
| − | + | In the WebHMI network settings, it is possible to monitor the status of the connections via modem or VPN and perform certain re-initialization of the interfaces. | |
| − | + | Go to the pages with the monitoring of connections are in the menu bars: | |
| − | :: | + | :: Modem/Modem Monitoring - '''modem''' monitor |
| − | :: | + | :: Network/VPN Monitoring - '''VPN interface''' monitor |
| − | + | The modem monitoring capabilities are shown in the following figure:<br> | |
[[Файл:Vpn monitor.png|850px]]<br> | [[Файл:Vpn monitor.png|850px]]<br> | ||
| − | + | Monitoring VPN is different in that to verify the connection, the actual VPN address of the server to which it is connected is used. | |
| − | == | + | == Routing == |
| − | |||
| − | |||
| − | |||
| − | |||
| − | |||
| − | |||
| − | |||
| − | |||
| − | |||
| − | |||
| − | |||
| − | |||
| − | |||
| − | |||
| − | |||
| − | |||
<br> | <br> | ||
| − | + | Example of usage: | |
[[Файл:Проверка сетевых настроек.png|none|600 px]] | [[Файл:Проверка сетевых настроек.png|none|600 px]] | ||
Текущая версия на 09:45, 5 января 2018
Содержание
LAN and WAN interfaces
In any project for WebHMI you have to connect to local network or Internet. There are several options how to do this, and the most reliable is wired Ethernet.
WEBHMI has 2 RJ45 network connectors labeled LAN and WAN. By default, the LAN is configured as DHCP -server that automatically distributes network settings to the connected devices, and WAN as a DHCP client focused on connecting to a network that already has a A DHCP server, for example, a router distributing the Internet. In addition, the settings Firewall forbids all incoming connectoins from WAN network, and therefore access to WebHMI's web-interface is possible only from LAN. [1]. You can change the current settings using the Network setup section, which you can access via the link on the authorization page or from the Setup / Network setup menu after logging in
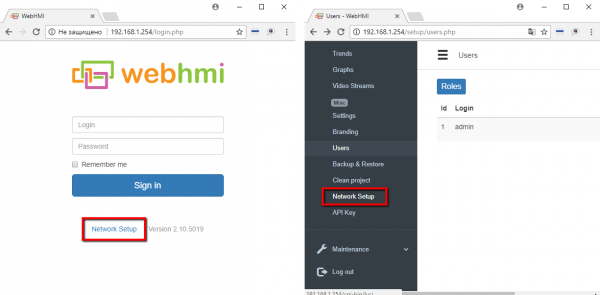
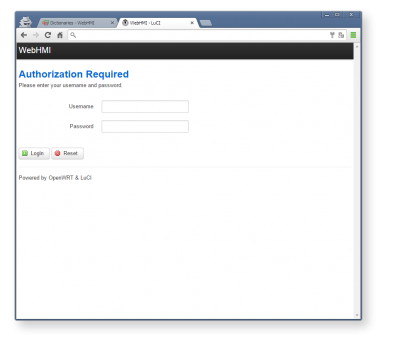
Login to the network settings section requires authorization. Default requisites are Login: admin / Password: webhmi
ATTENTION! For security reasons, during the project setup process, please change the default password
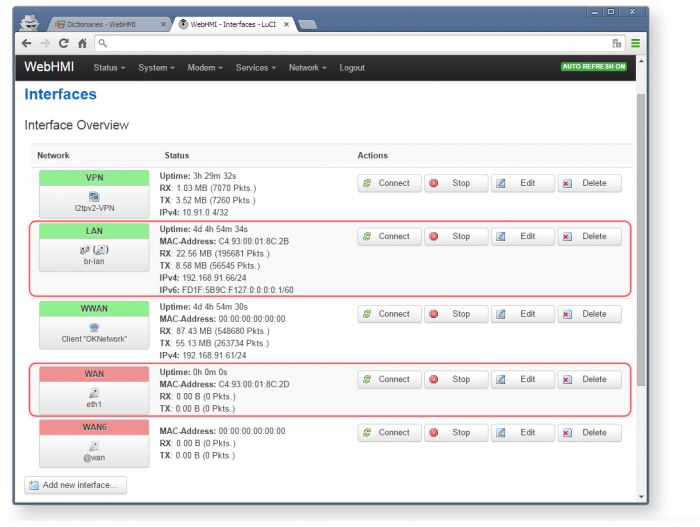
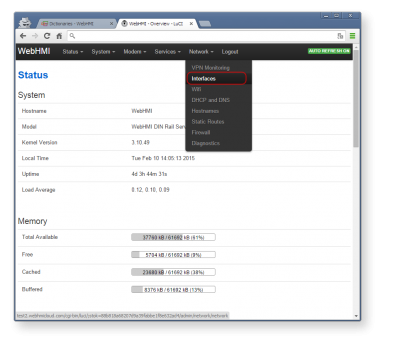
All network settings are grouped in the 'Network' tab. The submenu 'Interfaces' allows you to create, configure and manage network connections.
This page displays general information that describes the current status of network connections. To change the interface settings (LAN or WAN), press Edit.
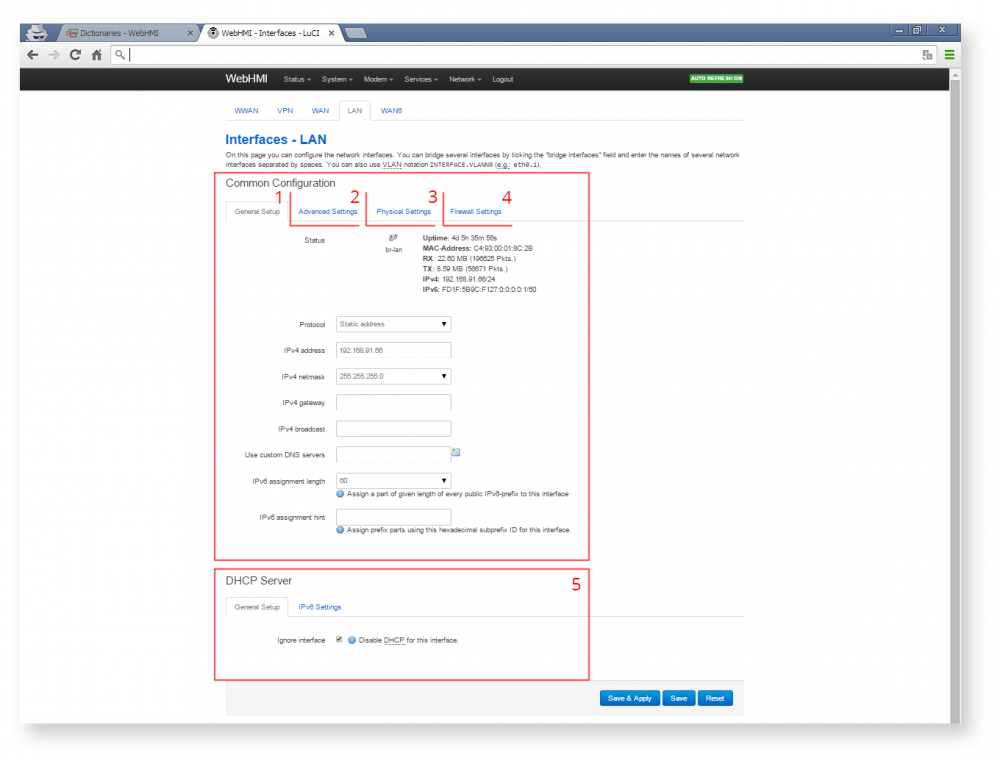
All settings for convenience are divided into several separate groups of bookmarks:General, Advanced, Physical и Firewall settings:
General setup allows you to set general (basic) settings, which will differ, depending on the selected protocol type (connection method: Static IP, DHCP, PPPoE, L2TP, etc.). In the case of static addressing (the most widely used option), this will be: host IP address, subnet mask, gateway address and DNS server address.
In 'Advanced settings' the following parameters are set: MAC address (device identifier used by link-layer protocols, as well as security systems for controlling access to network resources and packet filtering),MTU maximum transmission unit and gateway metric.
Physical settings defines bindings to the communication adapters of the device. In this tab, you can combine several interfaces in a bridge, thus linking several segments of the network, and also using STP, to organize fault-tolerant channel reservation (STP - Spanning Tree Protocol Allows you to create redundant links between network segments, avoiding topological loops and looping packets).
The tab Firewall settings allows you to specify the group policies according to which incoming and outgoing traffic will be processed for this connection.
In the most general case, to connect WEBHMI to the local network it will be enough to configure only a few important parameters.
General settings tab:
Protocol indicates the type of connection. Despite all the visible diversity, for the local network, only two options are possible: DHCP client and Static address. DHCP-client means obtaining network settings automatically (possible only if there is a DHCP server on the network), in the case of Static address, the settings are entered manually by the user.
TIP. As a rule, dynamic addressing is not convenient for providing any services within the network. Each time resource addresses will change and access to them will be more difficult
2. IP address is the unique address of the device (node) in the IP network. In the version of IPv4 it is 4 bytes in length and written through a point of the type xx.xx.xx.xx. The IP address of the device consists of the network address and the node address in this network (defined by the subnet mask). You can read about addressing rules in IP networks here.
WARNING! If several devices with the same IP address are connected to the same network, this will cause an address conflict, which will lead to the disconnection of one of the devices. This is possible, for example, if you simultaneously connect two WebHMI devices with the factory configuration to the network
3. IP netmask (subnet mask) - indicates which part of the IP address (high-order bits) refers to the network address, and which one (minor) to the host (node) address in this network. In IPv4, the subnet mask has a length of 4 bytes and is written by byte, through a point, similar to the IP address.
4.IP gateway(gateway) is the address of a device on the network that processes all packets directed outside this network (devices with an address from another network).
Firewall settings tab:
5. You must specify which zone this interface belongs to. In this case LAN or WAN. For more information, seeМежсетевой экран (Firewall)
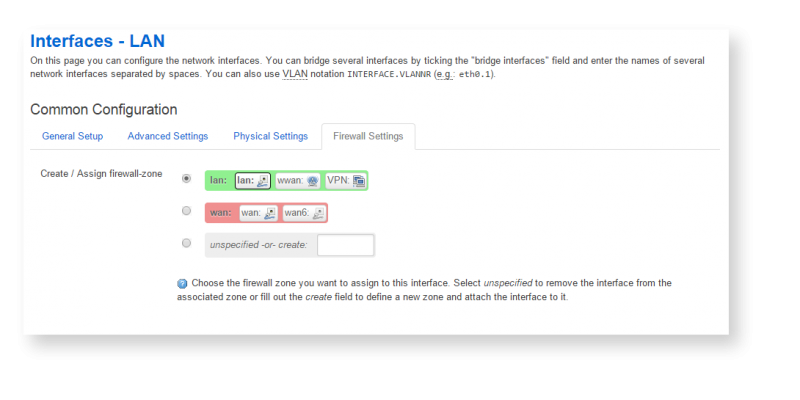
WARNING! If all incoming connections for all networks are disabled, the WEB interface of the device will be completely lost. In this case, you will have to restorereset settigs and all data, including the project, will be lost
6. DHCP Server (Dynamic Host Configuration Protocol) – Protocol for automatic configuration of IP network nodes. If the device is connected as a DHCP client, or the network uses static addressing, disable this option.
After changing the settings, click Save & Apply at the bottom of the screen. The new settings will take effect in a few seconds.
WARNING! If you change the network settings, in the case of NO ACCESS TO THE DEVICE, be sure to check the network connection settings of your PC
Firewall
General information
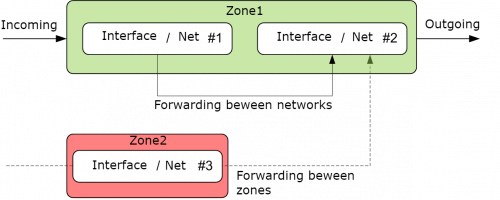
The WebHMI firewall 'maps' one or more networks / interfaces in special zones, which are used to describe the default rules for this interface, the rules for forwarding packets between interfaces, and additional rules that do not fall under the first two types. All traffic for the network interface can be classified as incoming, outgoing, or redirected. In the firewall's network settings menu, for convenience, descriptions and comments to all its fields are provided.
In the operating system configuration file, the default firewall rules goes first, but they take effect last. The filtering system uses sequential processing, in which the packets are processed sequentially, in a chain, by different rules. The first matching rule is executed, but it often performs a transition to another chain of rules that the packet is moving on until it meets ACCEPT (accept) or DROP / REJECT (discard) commands. Rules with such commands are executed last in the chain of rules, so the default rules will come into effect last, and more specific rules will be checked first. Zones are used to configure masquerading, also known as NAT, as well as for configuring port forwarding rules, more commonly known as redirection.
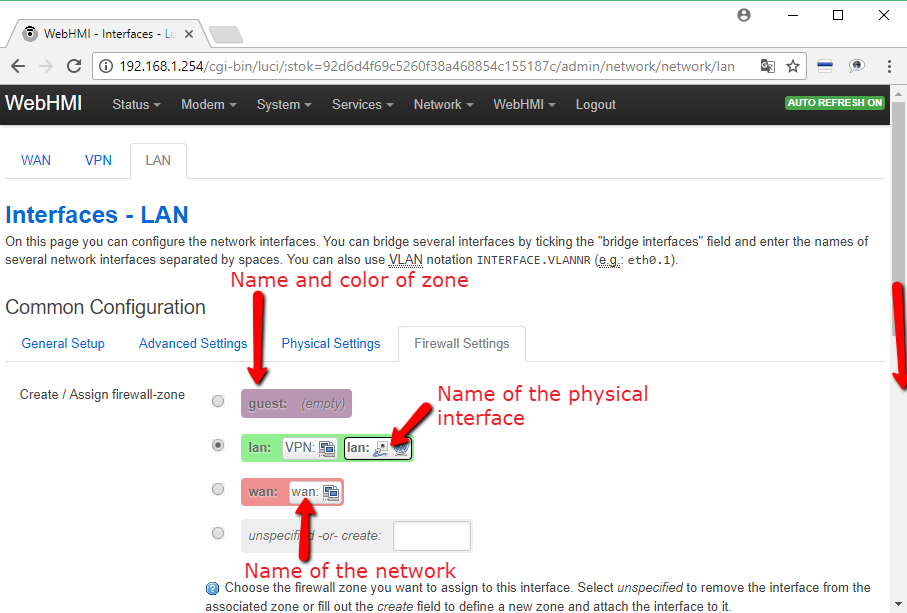
Zones should always be assigned to one or more interfaces. You can assign a zone to the interface in the tab of its properties Firewall settings. In the factory configuration of WebHMI, two zones are configured with their own rules, which are sufficient for working in 99% of the cases - the wan zone (in which the Internet gateway is usually located) prohibits incoming traffic, but allows redirection from the lan zone to wan. The names of the zones lan (green) and wan (red) by default coincide with the names of the network interfaces LAN and WAN to which they are assigned, however, the zones can be called arbitrary:
Here, the names of the wan and wlim zones differ from the names of the WWAN and WFONLY networks, respectively.
Zone edit
You can create and edit firewall zones in the Network / Firewall menu.
The key properties of the zones are displayed on this page in a separate list. In this example:
- The zone lan contains 2 networks - a network lan with 2 adapters included in the bridge and a vpn network, all traffic is allowed - incoming, outgoing and redirected inside the zone between adapters, redirection to another zone - wan is allowed.
- The wan zone contains one wwan network from which no redirection to another zone is allowed, only outbound traffic is allowed, masquerading is allowed and the MSS restriction is enabled
- the wlim zone contains one wfonly network from which it is prohibited Forwarding to another zone, incoming and outgoing traffic allowed, masquerading allowed
Edit Zone Menu:
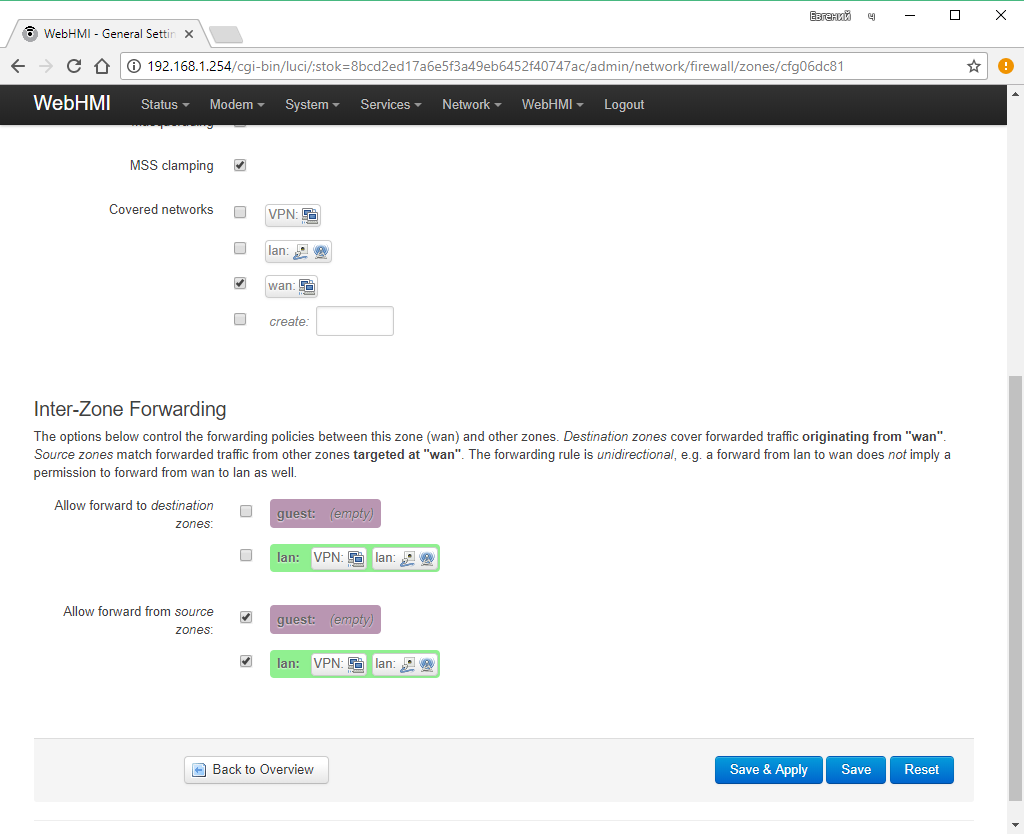
I.e. you can link networks to zones both when editing interfaces and when editing zones.
The redirection method can be only one for each zone (ie, the rule works in only one way) - i.e. If you want to allow mutual redirection between two zones, you need to describe the 2 rules in individual zones.
Default rules
There is a separate list for the rules for port forwarding (DNAT):
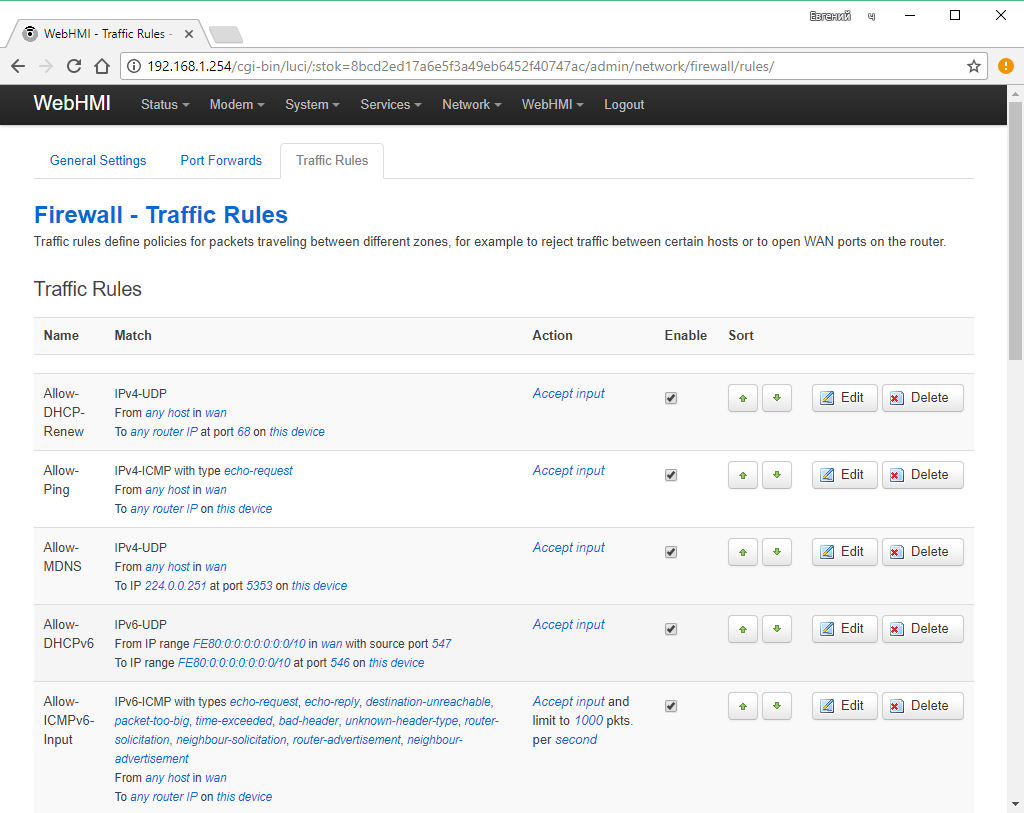
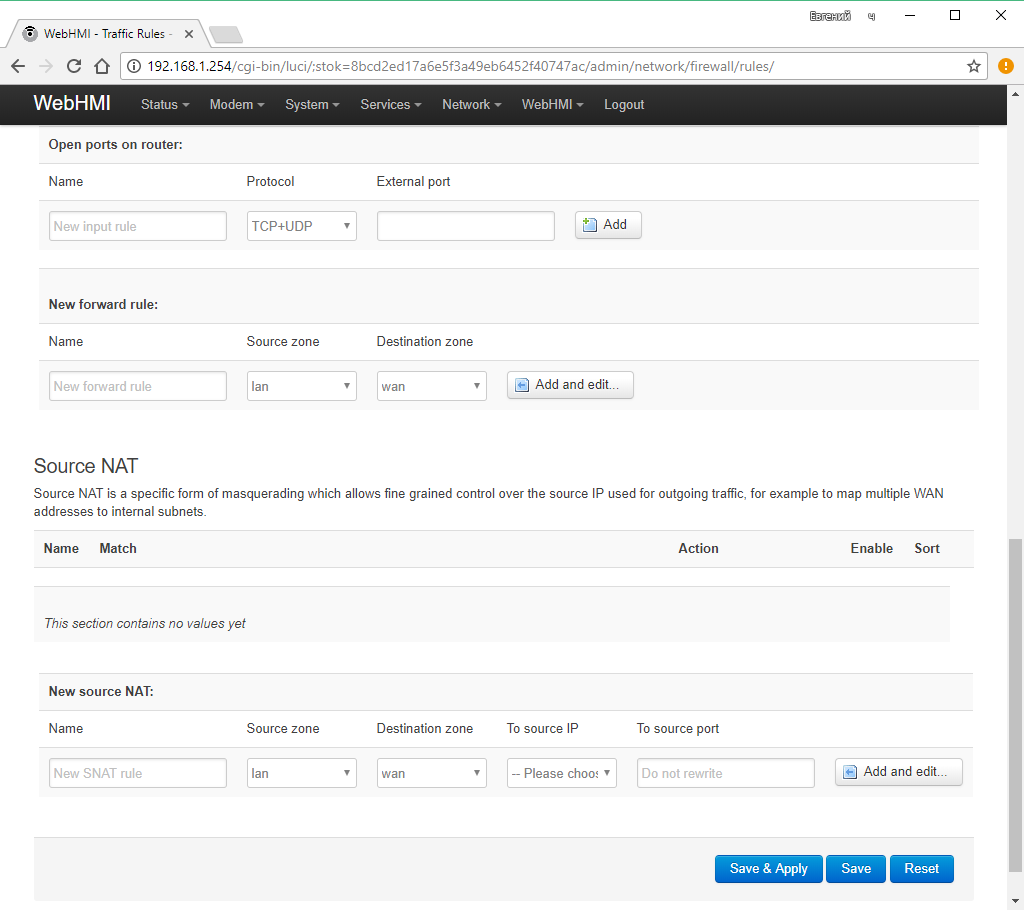
The list of general default rules (used if the special rules described above have not been fulfilled) is in the Rules for traffic tab. Here you can add and edit them, change the order of application in the chain of rules.
Example of using Firewall
As an example, let us consider the task:
There is WebHMI with Internet access, but it is required to deny access to the Internet to all users connected to WebHMI, except for two deices (laptop and mobile phone of the developer).
You could proceed as follows:
The interface local users will log on WebHMI through is attached to the zone where redirection to another zone is prohibited.
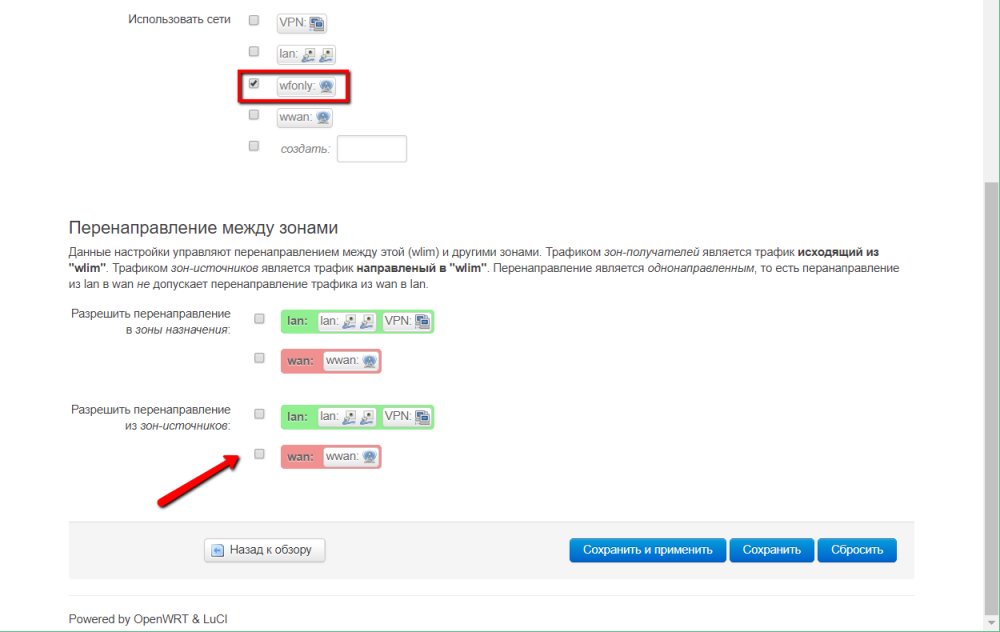
The result will be an zone in which incoming and outgoing traffic is allowed, but redirection to another zone (wan where there is Internet) is prohibited:
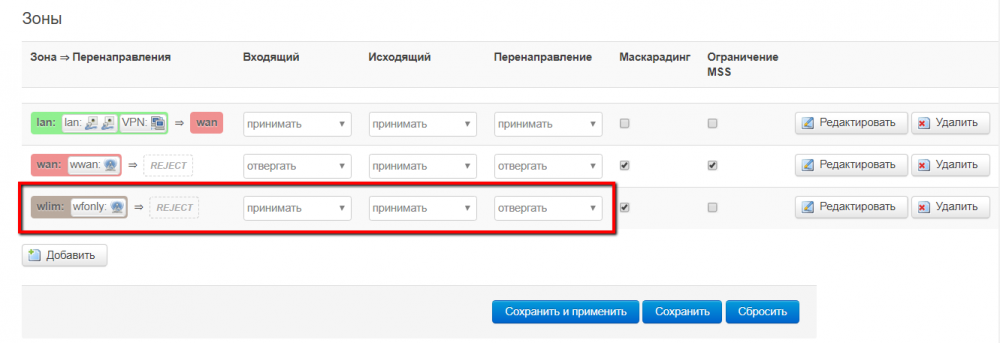
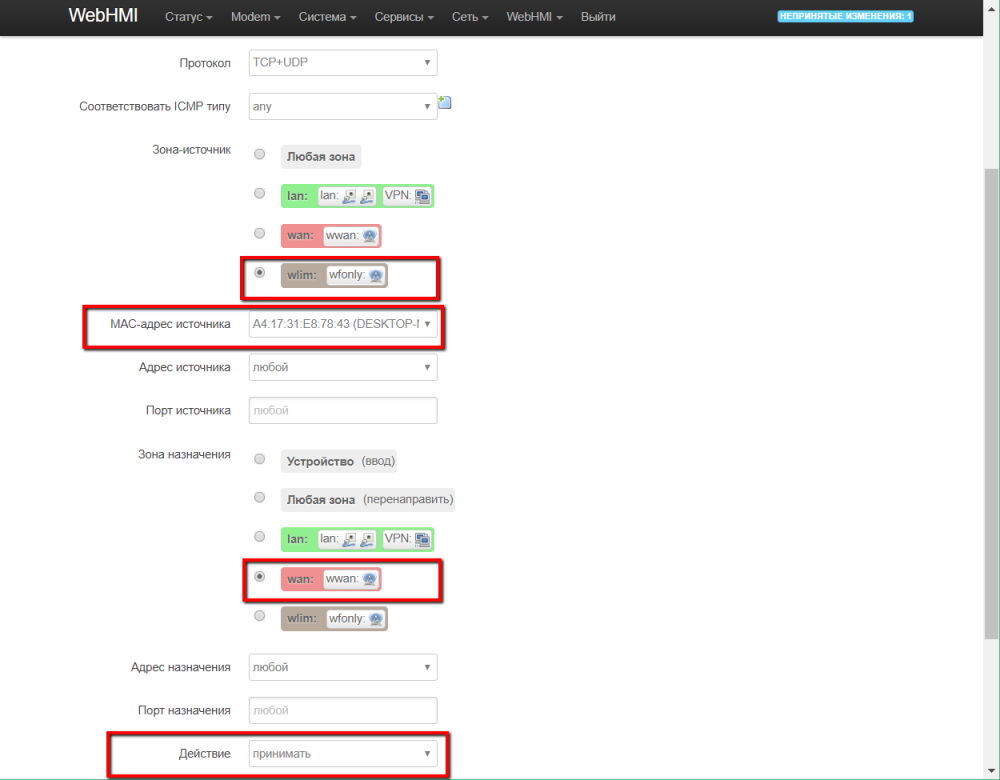
To enable traffic for specific devices (with specific MAC adapter addresses), you need to add rules for them to the default rule list.
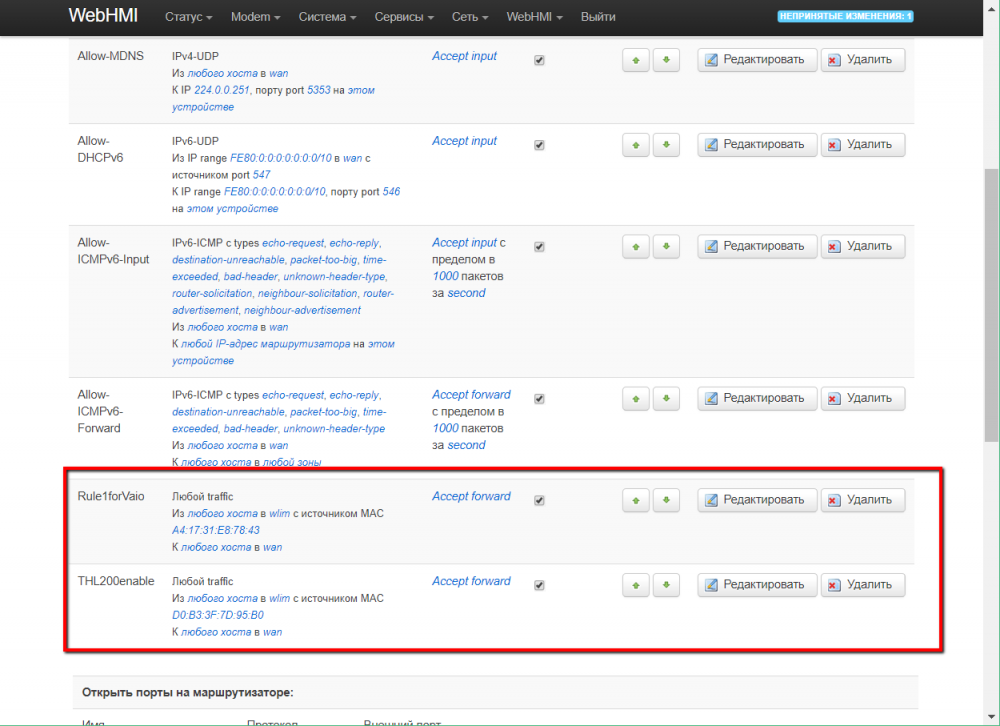
The rules look like this:
Wi-Fi
The capabilities of WebHMI in wireless Wi-Fi networks allow very flexible solutions for organizing communication with devices where, for whatever reason, you can not use a wired connection to the local network.
TIP. If there is such a possibility, you should always give preference to a more reliable wired connection in comparison with a wireless one..
WebHmi can be either a client in an existing network, or work in an access point mode. An interesting feature is the ability to work simultaneously in several networks! (For example, to connect to the Internet in one network and at the same time to distribute access to your resources to another one).
TIP. On the front of the device is a Wi-Fi indicator that shows the activity of wireless connections
Access point
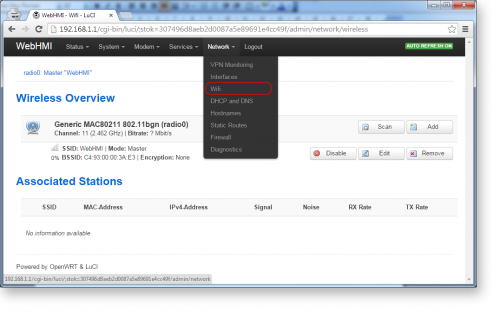
By default, the wireless interface WebHmi is configured as an access point. The settings for the wireless network settings are collected in the Network / Wi-Fi section of the main menu of the panel Network setup
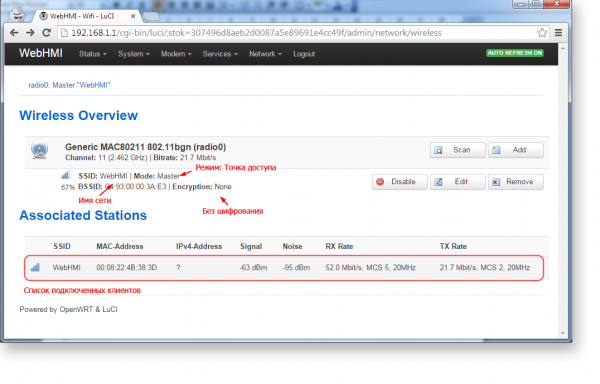
The opened window Wireless Overview shows the main parameters of existing wireless networks. From here you can manage them: add / remove, enable / disable, and change their settings
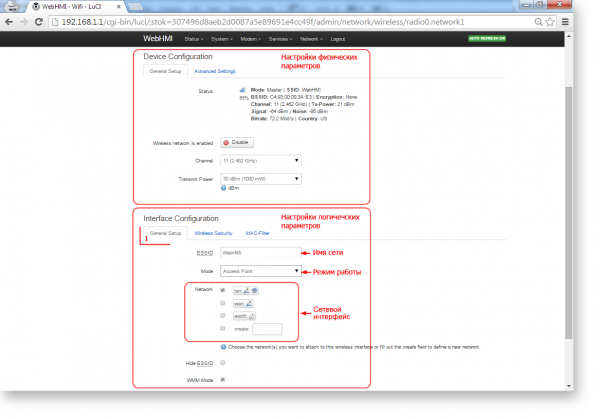
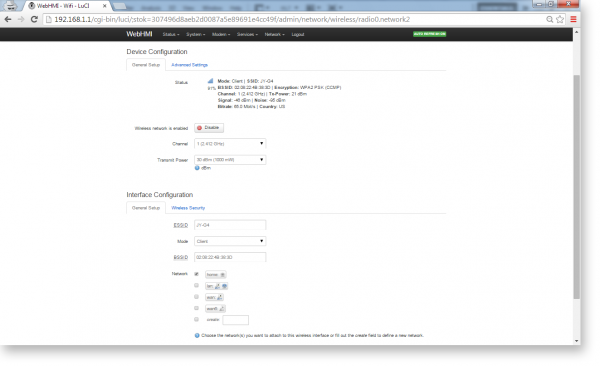
To change the settings of an existing network, click Edit. Here, all the parameters are divided into two groups: the physical settings that determine the parameters of the radio channel, which in most cases can be left untouched and logical, which determine, in fact, the properties of the wireless network - its identifier, mode of operation and security parameters.
ATTENTION! If you are connected to WebHMI via Wi-Fi, manipulation of wireless network settings may result in communication failure.
Interface configuration, General setup tab:
1. ESSID – wireless network name
2. Mode – work mode. In most cases, it will either be an 'Access point' when creating a new wireless network, or Client - when connecting to an existing network.
3. 'Network '- defines the physical binding of this network to a new another already existing network (connecting a bridge type), or creating a new interface for it
TIP. If you are not supposed to connect guest devices to this wireless network, you can hide it using the Hide ESSID
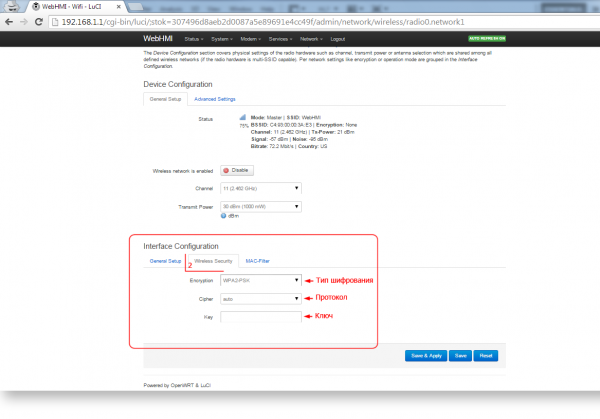
The 'Wireless Security' tab defines the security settings for the wireless network.
TIP. To limit access to wireless networks, use more advanced technology WPA2-PSK.
4. Encryption - Select the type of encryption or leave the network open
5. Key – Come up with a security key (from 8 to 63 characters)
6. Save changes Save & Apply
Similarly, you could create a new wireless network.
However, this is not the end. As a result of the manipulations, only a new network interface has been created so far (like the device, the network adapter), which appears in the list of networks in the tab Interfaces, the menu Network. Now it will need to be configured to work in the IP network (assign an address, gateway, etc.) similarly to described earlier LAN and WAN interface settings
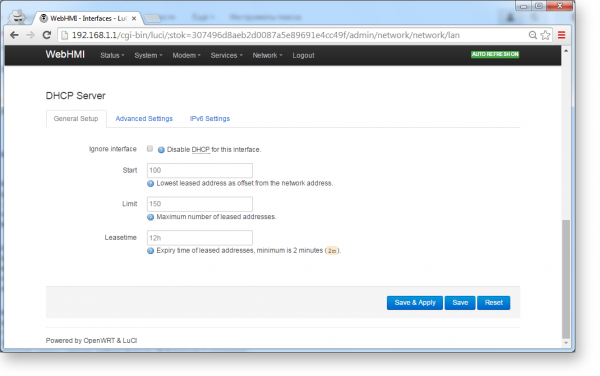
TIP. Typically, the 'Access Point' mode of operation assumes that there is a DHCP server in the network that distributes network settings to the connected clients. If necessary, enable this option when configuring the interface.
Connect to an existing network (Client mode)
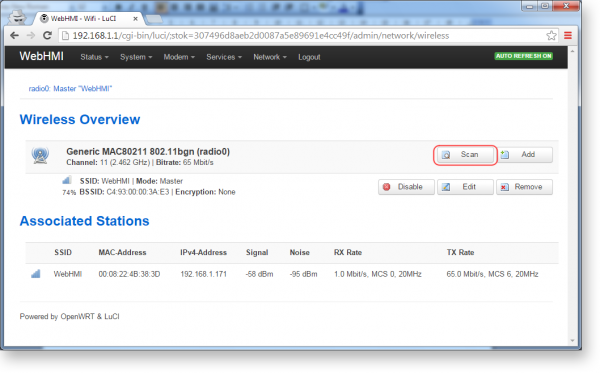
1. Press Scan in Wireless Overview window, Network / Wi-Fi menu
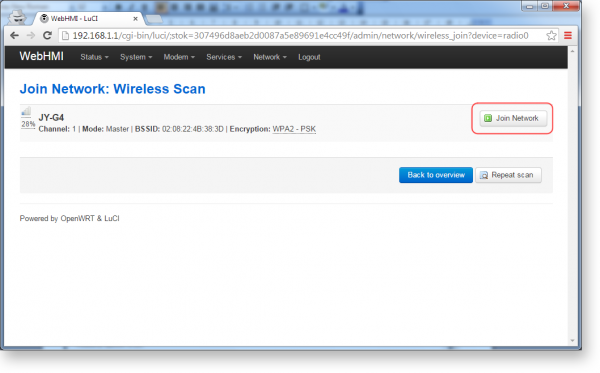
WebHMI will show the list of found networks.
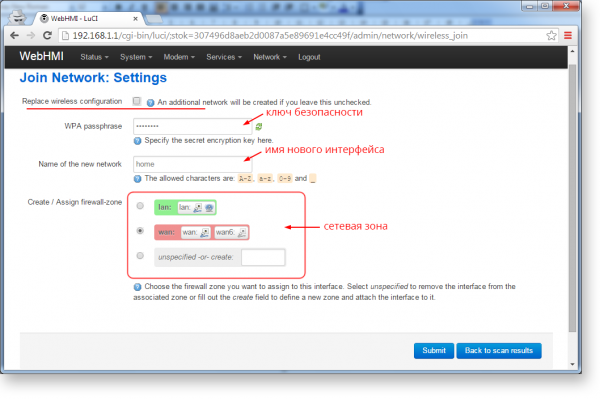
2. Press Join Network for the network you're going to connect to.
In the appeared window:
3. Enter the network security key to which you are connecting
4. Specify the name of the network (how it will be displayed in the system). Note the Replace wireless configuration option, at the top of the screen. If it is selected, the new wireless network will replace the existing one, if not, then a new network will be created.
5.Based on the level of trust in the network, specify the desired network zone that defines the traffic processing rules for this connection. For details, see theFirewall
6.In the window that appears, click Save & Apply. Most part is finished now.
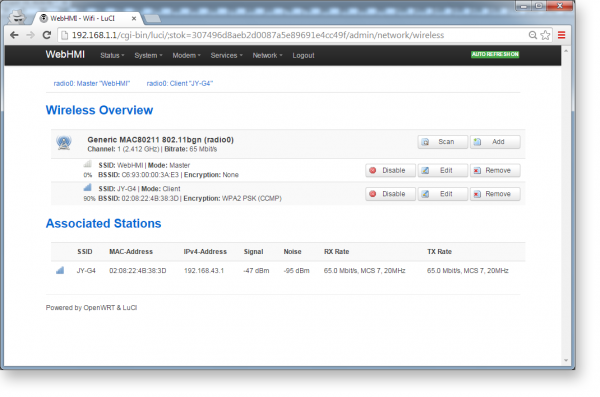
In the Wireless Overview window, you will see a new wireless network (in this case there are two of them: one has a WebHMI client and the other has an access point).
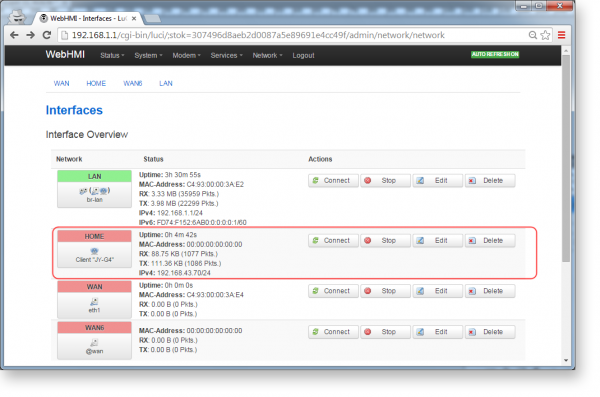
You can see or change the settings of the network connection in the same place, in the tab ' Network / Interfaces'
Connecting WebHMI to the Internet
A common task is to configure WebHMI with simultaneous access to the Internet as WebHMI, and the computer from which to configure.
Let's consider several connection scenarios.
Option 1. The computer and WebHMI connect to one external wireless network with the Internet.
WebHMI with factory settings has only one WiFi connection - 'access point'. Therefore, the first step should be to connect it to the wireless network by the 'client' (for example we will call this WebHMI-DDS network). You can configure the WebHMI itself either over Ethernet (см. here), and connecting to its WiFi network 'master'. In the latter case, you need to specify the option to add a new wireless network without replacing the existing one, otherwise after the new WiFi network of the 'client' is switched on, the network 'access point' through which the computer or laptop is connected will be lost. For more on this,here. Then, after WebHMI is connected to the WebHMI-DDS network as a 'client', remember the IP address of the wireless network it has received. For example, in the following figure, WebHMI received an IP address of 192.168.1.203. Now you can disconnect the computer from WebHMI and connect to the WebHMI-DDS wireless network. To enter WebHMI, you must this address.
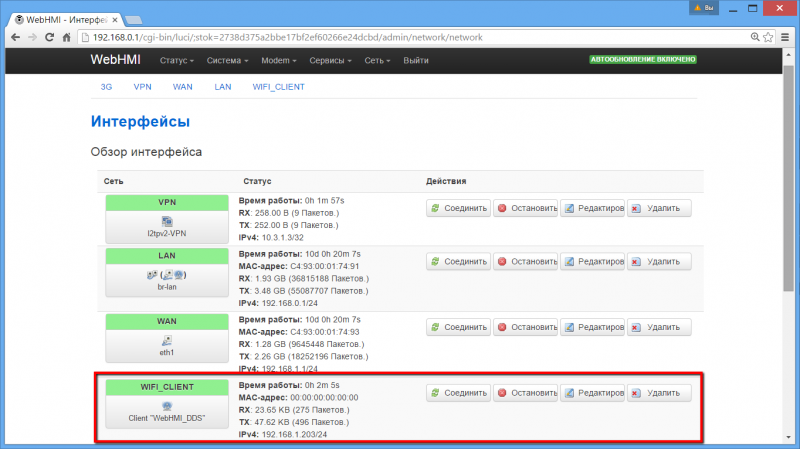
Now both the computer and WebHMI have Internet access, and you can access the web interface from a computer from a common wireless network.
Option 2. WebHMI is connected to the Internet, a computer (laptop) is connected to the Internet through it
Sometimes, working with WebHMI, it can be convenient to connect to it for configuration and use it as a gateway to Internet access. You can basically connect a computer (already connected to the Internet via a wireless network) with an Ethernet patch cord to WebHMI, and it in turn to the Internet via a wireless network, but depending on the current network settings and the operating system of the computer, you may have to deal with additional TCP / IP on a computer or WebHMI (usually only one primary gateway can be allowed on the computer, whereas if you simultaneously connect a computer with a statically configured gateway on one network adapter and are received by DHC P on the other - there may be a problem with access to the Internet). The WebHMI factory setting allows you to make this connection simple. Internet connection on WebHMI should be (and is by default) in the zone of the WAN firewall - i.e. The Ethernet cable with the Internet should be connected to the WAN port (eth1 interface in the network settings) or the client interface of the wireless network with the Internet (or 3G modem, if it is used for Internet access) must also be in the WAN zone. By default, only this zone is configured with the masquerading function, which provides the correct address conversion when redirecting packets. The computer needs to be connected through one connection - to the interface of the LAN zone (Ethernet LAN port) or the wireless network 'master' included in the same zone by default.
Thus, when using the factory settings, a computer connected to a WebHMI configuration that has Internet access will also have Internet access.
Wireless 3G Internet
If there is no wired connection to the Internet, you can connect WebHMI using a USB modem.
VPN
In cases where remote access to WebHMI devices is required, you can use the VPN technology.
The VPN access service is provided within the <a href="http://level2.webhmi.com.ua">Level2 system </a>.
0. Make sure WebHMI is configured to access the Internet. You can use the tools on the Network Setup-> Network-> Diagnostics page to verify it. Packets must go well, DNS should work correctly.
1. Go to Network Setup -> Network -> Interfaces. Press "Add new interface..." button.
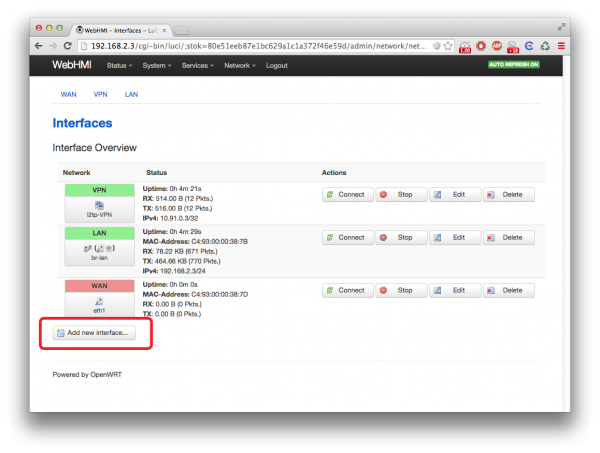
2. Enter the VPN as the connection name. This name is used in the watchdog script, which checks the connection status and can automatically reconnect this interface. So for the interface name 'VPN' is preferrable.
2. Select the L2TPv2 protocol and click 'Apply'.
3. On the General Setup tab, specify the following parameters:
L2TP Server: webhmicloud.com
PAP/CHAP username: [the password from the "Information" tab for this node in Level2]
PAP/CHAP password: [the password from the "Information" tab for this node in Level2]
4. Go to the 'Advanced Settings' tab and enter the number 15 or whatever in the Default gateway metric field. It is important that the Default gateway metric of the VPN interface has more than the Default gateway metric at the interface on which the connection to the Internet is going.
5. On the 'Firewall Settings' tab, assign a lan zone for this interface to allow incoming connections. If this is not done then the firewall will not allow incoming connections on the VPN and will not get access to the device from the outside.
Enable VPN Monitoring on the Network-> VPN Monitoring page to automatically restart the VPN connection in case of communication problems.
Auto recover function for 3G and VPN
In the WebHMI network settings, it is possible to monitor the status of the connections via modem or VPN and perform certain re-initialization of the interfaces. Go to the pages with the monitoring of connections are in the menu bars:
- Modem/Modem Monitoring - modem monitor
- Network/VPN Monitoring - VPN interface monitor
The modem monitoring capabilities are shown in the following figure:
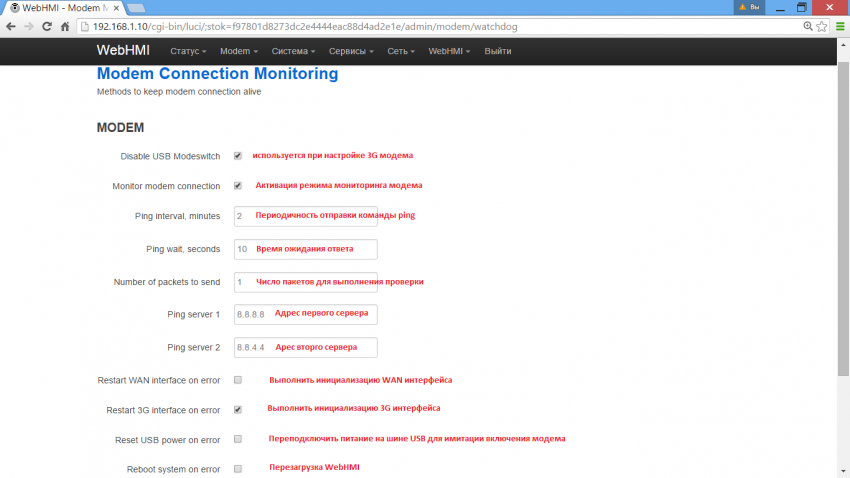
Monitoring VPN is different in that to verify the connection, the actual VPN address of the server to which it is connected is used.
Routing
Example of usage:
