Удалённый сервисный доступ/en — различия между версиями
FuzzyBot (обсуждение | вклад) (Обновление для соответствия новой версии исходной страницы.) |
|||
| (не показано 6 промежуточных версий 2 участников) | |||
| Строка 1: | Строка 1: | ||
<languages/> | <languages/> | ||
| − | == | + | == Features == |
| − | + | Remote service access allows you to implement programming, configuration or diagnostics of automation equipment connected to WebHMI, for example, controllers or frequency drives remotely with the help of standard utilities and development tools of the equipment manufacturer. The scheme of work is given below. To implement remote service access, the WebHMI VPN network interface is used. The developer's computer must also be connected to this VPN network, and in the WebHMI network settings, the appropriate rules have to be set for translating network addresses from the VPN network to the target equipment network. In case the equipment uses a serial port instead of Ethernet, it is enough to install the virtual COM port driver on the computer and use the built-in WebHMI. function[http://wiki.webhmi.com.ua/index.php/Virtual_UART Virtual COM port configuration]. The user can either organize his VPN network or use the network provided by the device developer. <br> | |
[[Файл:RemoteAccess jpg.jpg|800px]] | [[Файл:RemoteAccess jpg.jpg|800px]] | ||
| Строка 9: | Строка 9: | ||
:: преобразователь частоты Delta Electronics, коммуникационные параметры: протокол Modbus ASCII адрес в сети 1, скорость 38400, 7N2, подключен к встроенному порту RS-485 WebHMI | :: преобразователь частоты Delta Electronics, коммуникационные параметры: протокол Modbus ASCII адрес в сети 1, скорость 38400, 7N2, подключен к встроенному порту RS-485 WebHMI | ||
</p> | </p> | ||
| − | |||
| − | |||
| − | |||
== Connecting PC to the VPN network == | == Connecting PC to the VPN network == | ||
| Строка 47: | Строка 44: | ||
== Establishing communication with remote devices behind the gateway via TCP / IP == | == Establishing communication with remote devices behind the gateway via TCP / IP == | ||
| + | The system structure and neccessary steps are given on the diagram:[[Файл:Remote access function ENG.png | 1024px | left]] | ||
| + | <br clear = all> | ||
You must enable the virtual IP address function for the specified WebHMI node on Level2 | You must enable the virtual IP address function for the specified WebHMI node on Level2 | ||
[[Файл:Level2 settings virtIP.png]] | [[Файл:Level2 settings virtIP.png]] | ||
| Строка 61: | Строка 60: | ||
== Establishing communication with remote devices behind the gateway via a virtual COM port == | == Establishing communication with remote devices behind the gateway via a virtual COM port == | ||
| + | System structure for this mode is given below: | ||
| + | [[Файл:Remote access function serial ENG.png| 1024px | left]] | ||
| + | <br clear = all> | ||
Please refer to this [[http://wiki.webhmi.com.ua/index.php/Настройка_виртуального_UART Setting up virtual COM port]].<br> | Please refer to this [[http://wiki.webhmi.com.ua/index.php/Настройка_виртуального_UART Setting up virtual COM port]].<br> | ||
As an IP address, you need to specify the WebHMI address in the VPN network, for example 10.0.0.5, and take the TCP port number from the connection settings in the virtual com port mode.<br> | As an IP address, you need to specify the WebHMI address in the VPN network, for example 10.0.0.5, and take the TCP port number from the connection settings in the virtual com port mode.<br> | ||
Текущая версия на 10:00, 7 февраля 2018
Содержание
- 1 Features
- 2 Connecting PC to the VPN network
- 3 Establishing communication with remote devices behind the gateway via TCP / IP
- 4 Establishing communication with remote devices behind the gateway via a virtual COM port
- 5 Пример настройки проекта TIA Portal V13 для ПЛК Siemens S7-1200 (доступ через Ethernet)
- 6 Пример настройки проекта Step 7 Micro/WIN для ПЛК Siemens S7-200 (доступ через последовательный порт PPI)
Features
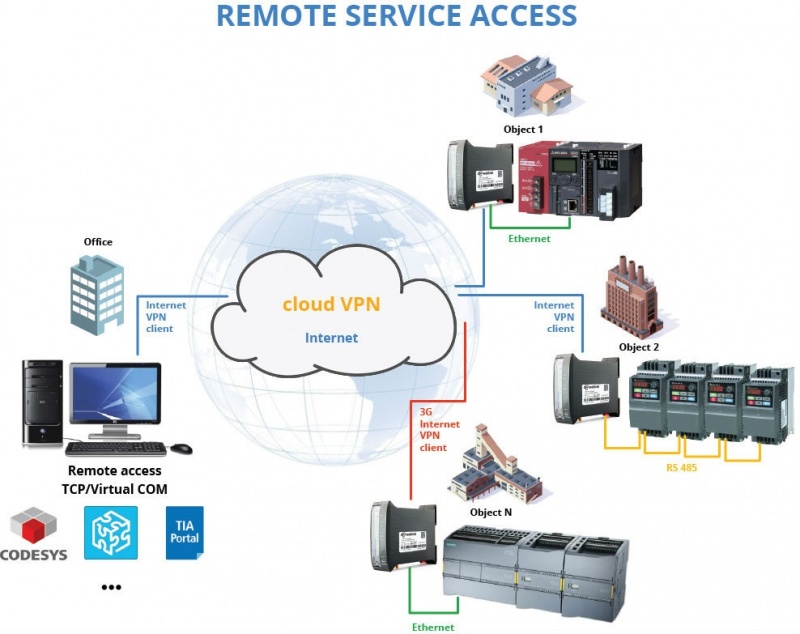
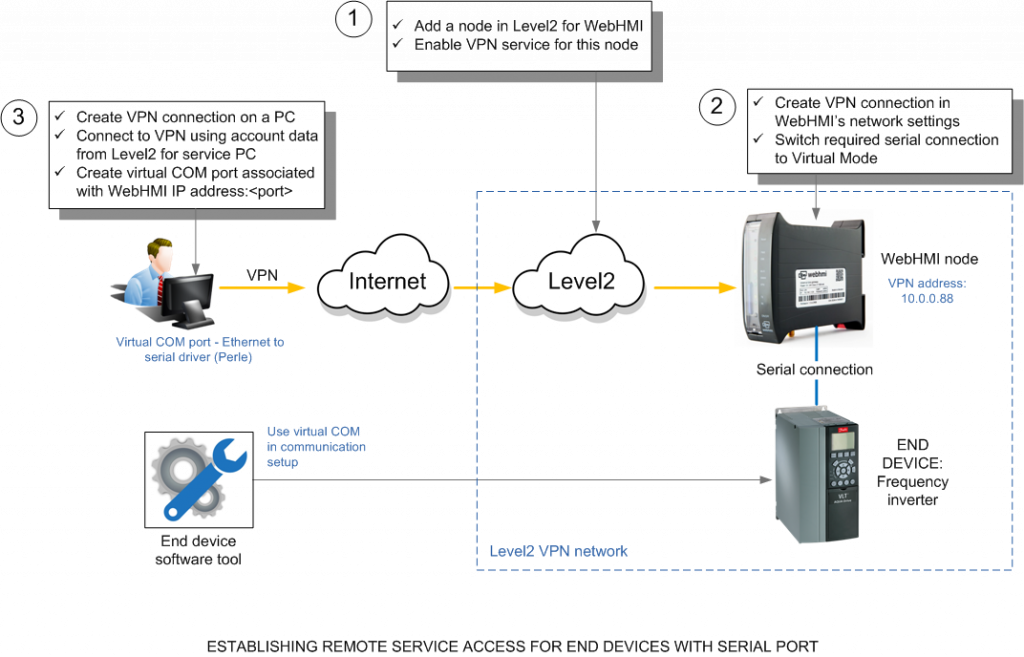
Remote service access allows you to implement programming, configuration or diagnostics of automation equipment connected to WebHMI, for example, controllers or frequency drives remotely with the help of standard utilities and development tools of the equipment manufacturer. The scheme of work is given below. To implement remote service access, the WebHMI VPN network interface is used. The developer's computer must also be connected to this VPN network, and in the WebHMI network settings, the appropriate rules have to be set for translating network addresses from the VPN network to the target equipment network. In case the equipment uses a serial port instead of Ethernet, it is enough to install the virtual COM port driver on the computer and use the built-in WebHMI. functionVirtual COM port configuration. The user can either organize his VPN network or use the network provided by the device developer.
Ниже приведен пример удаленного доступа к устройствам установленным за шлюзом WebHMI, включенным в VPN сеть разработчика ООО "ДДС":
- устройство распределенного сбора u-remote, коммуникационные параметры: протокол Modbus/TCP ip-адрес 192.168.0.210 (маска подсети 255.255.255.0), подключен в порту LAN WebHMI
- преобразователь частоты Delta Electronics, коммуникационные параметры: протокол Modbus ASCII адрес в сети 1, скорость 38400, 7N2, подключен к встроенному порту RS-485 WebHMI
Connecting PC to the VPN network
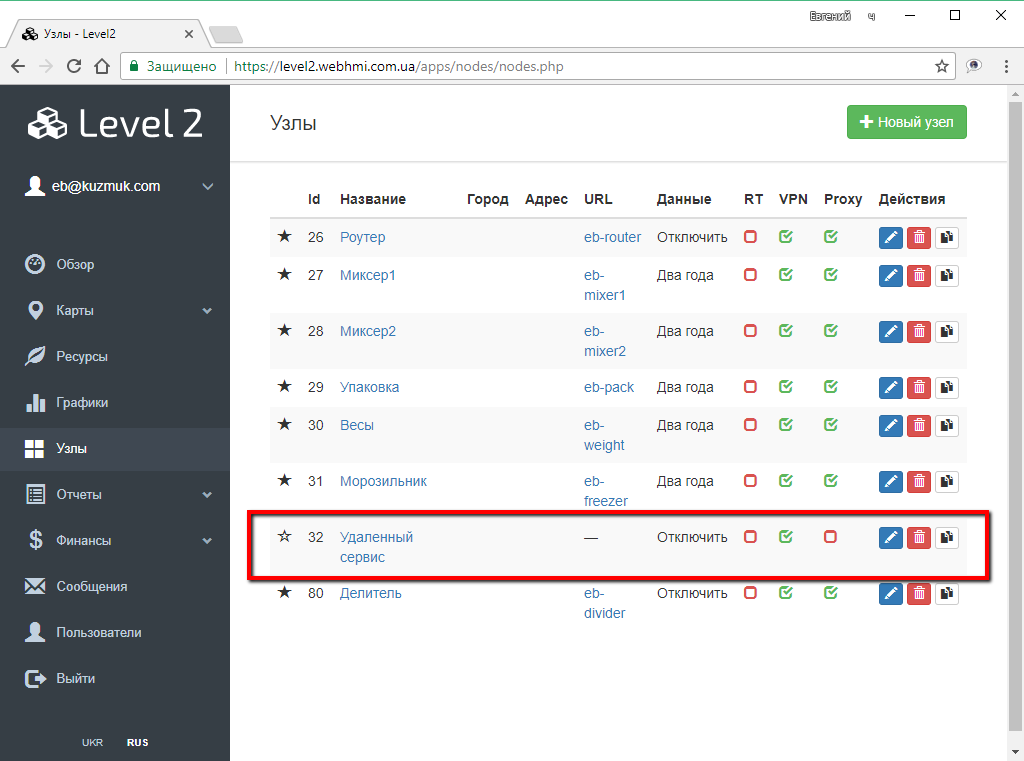
The first step is to create a node in Level2 which will be used for remote access via VPN (not for WebHMI modules)
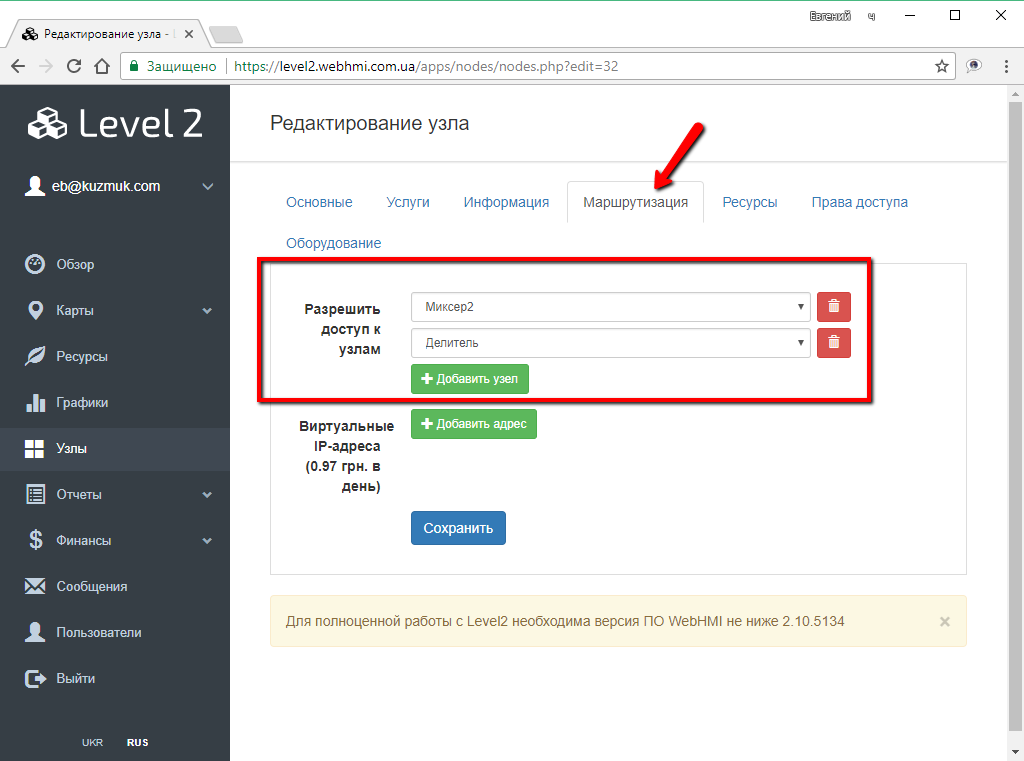
In this node settings, one should enable routing to the nodes for remote access.
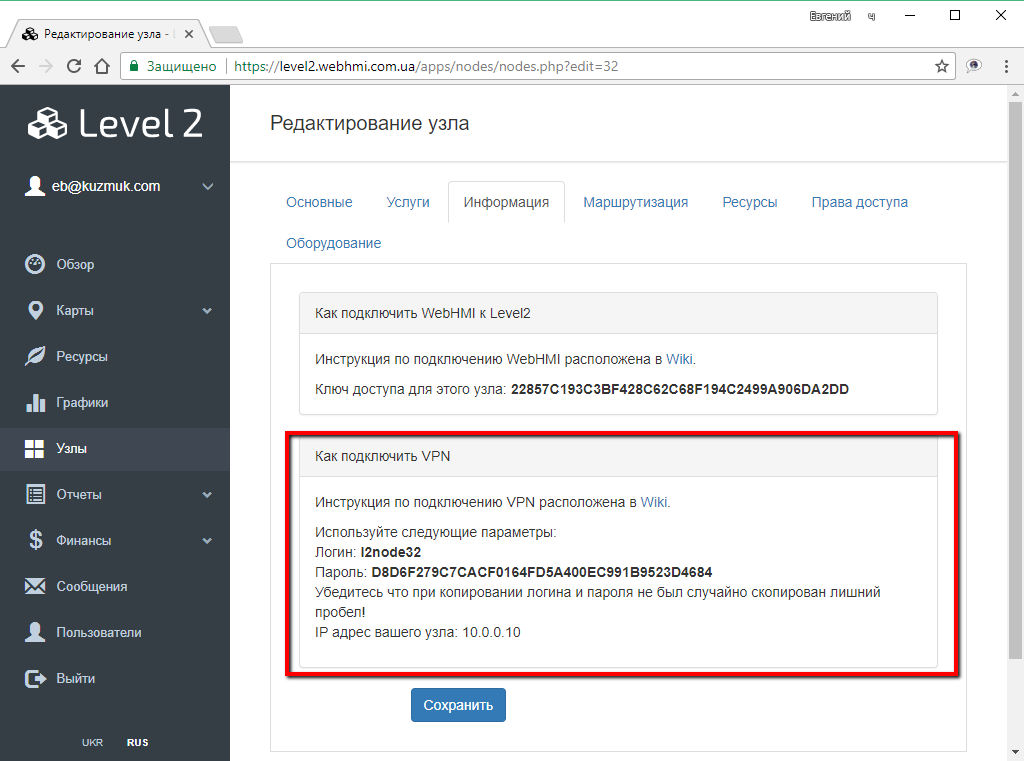
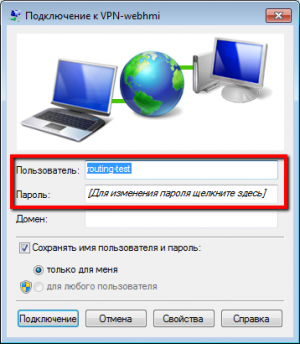
Also, you need to remember the VPN connection (login / password) data that will be needed in the future:
Next step is to create a VPN connection on the PC(for example, Windows 7 setup is given).
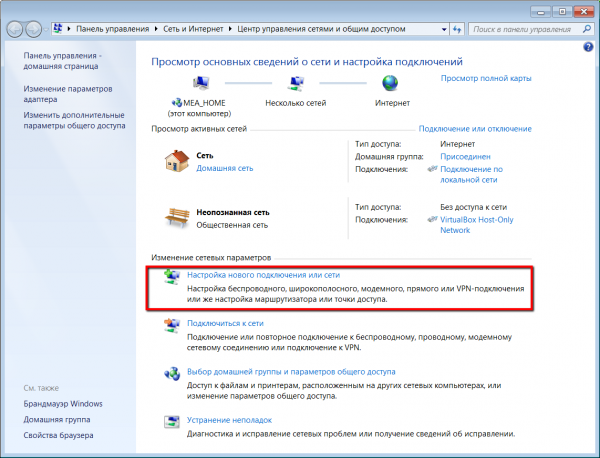
In the 'Network and Sharing Center' create a new connection:
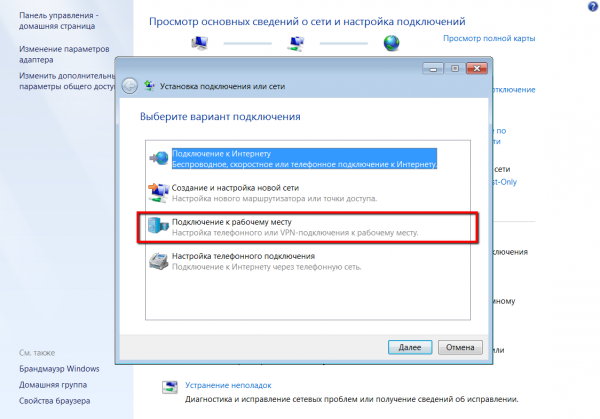
Select the option 'Connect to the workplace'
Create a new connection
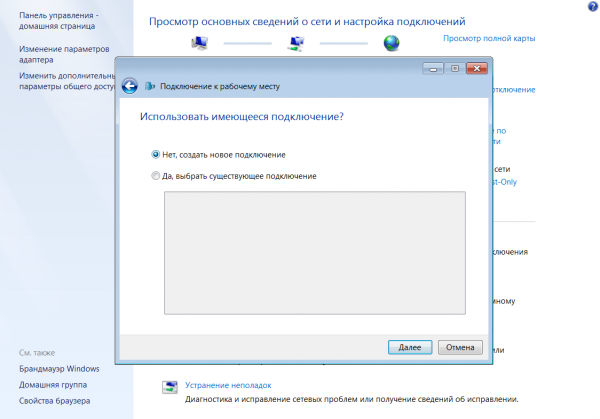
Use existing internet connection:
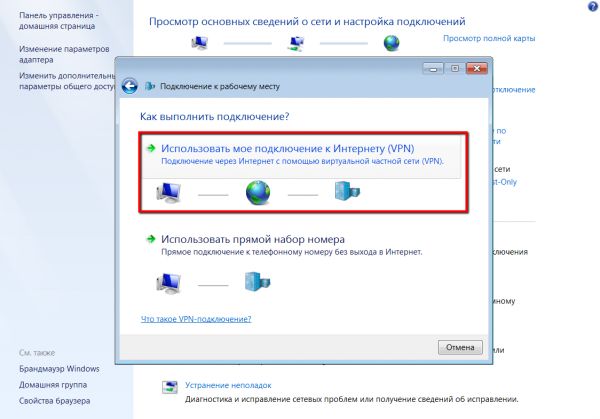
Specify the address of the vpn server and postpone the connection - to modify the connection properties
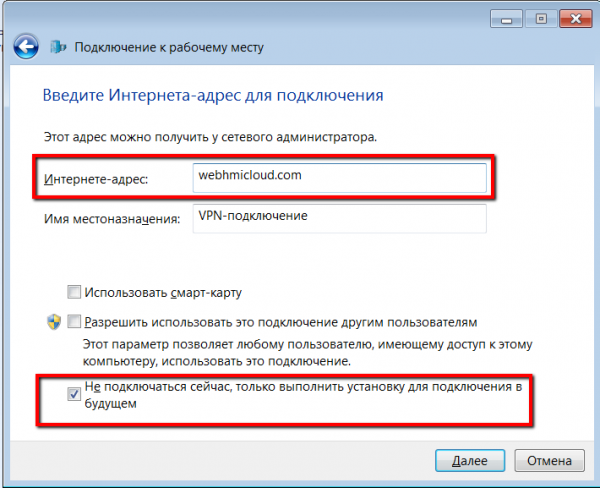
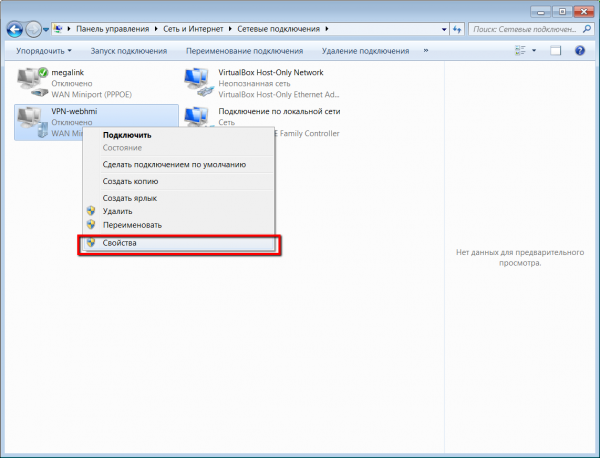
Then you need to edit the properties of the created vpn connection:
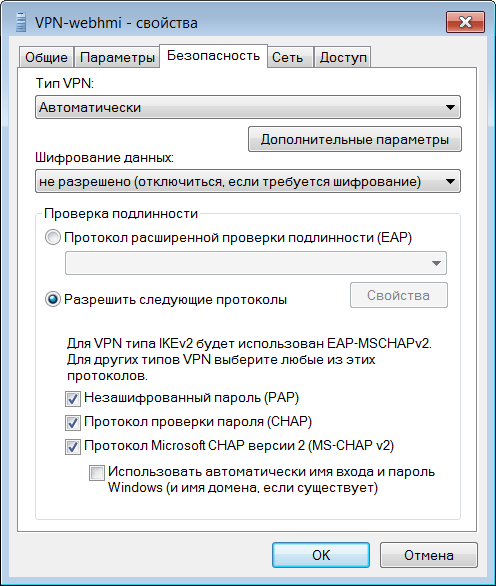
In the properties window on the Security tab, disable encryption, enable PAP / CHAP protocols:
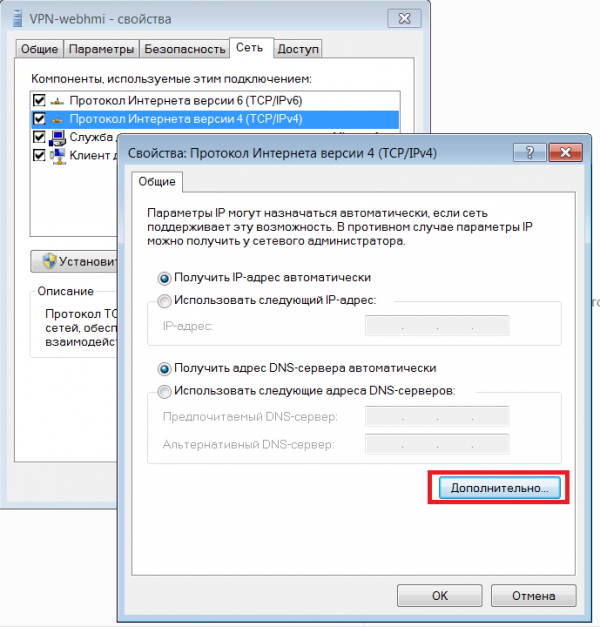
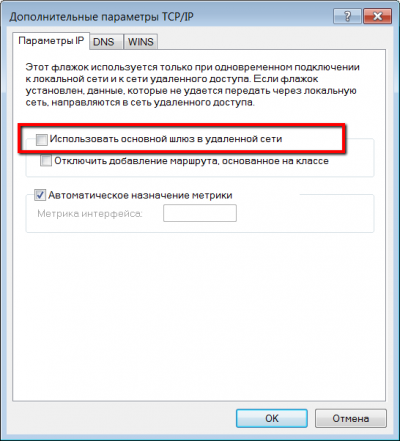
In the 'Network' tab, in the properties of the TCP protocol, you need to remove the option to use the default gateway from the VPN network, otherwise the Internet will stop working on the computer after the connection.
After setting up the connection, you can establish connections using the login and password from the node info tab in Level2.
Solving problems with connecting a PC to a VPN - - [here]
Establishing communication with remote devices behind the gateway via TCP / IP
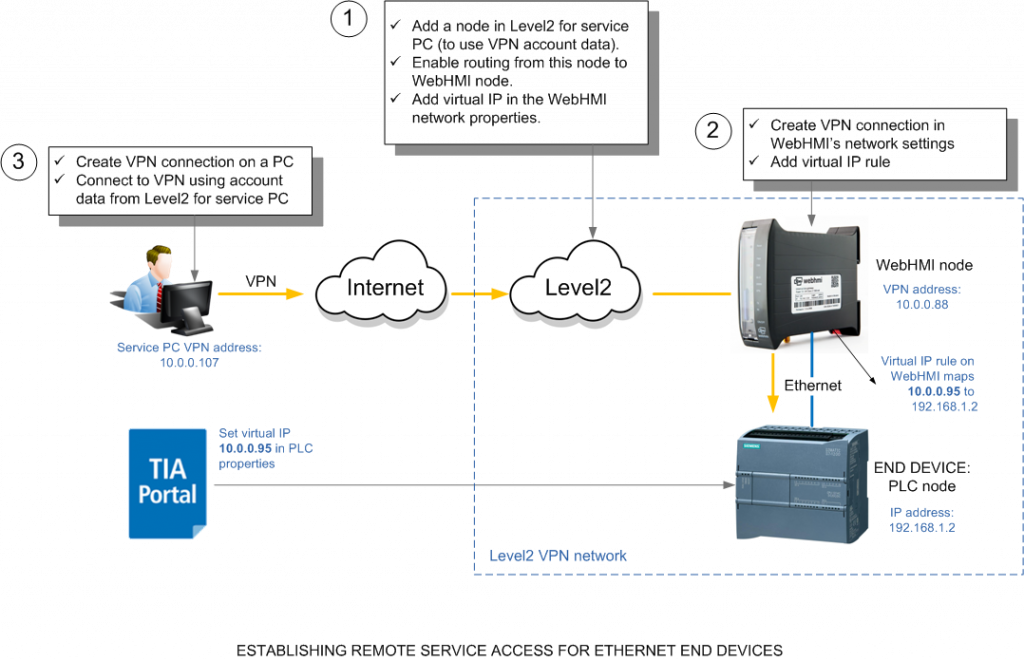
The system structure and neccessary steps are given on the diagram:
You must enable the virtual IP address function for the specified WebHMI node on Level2
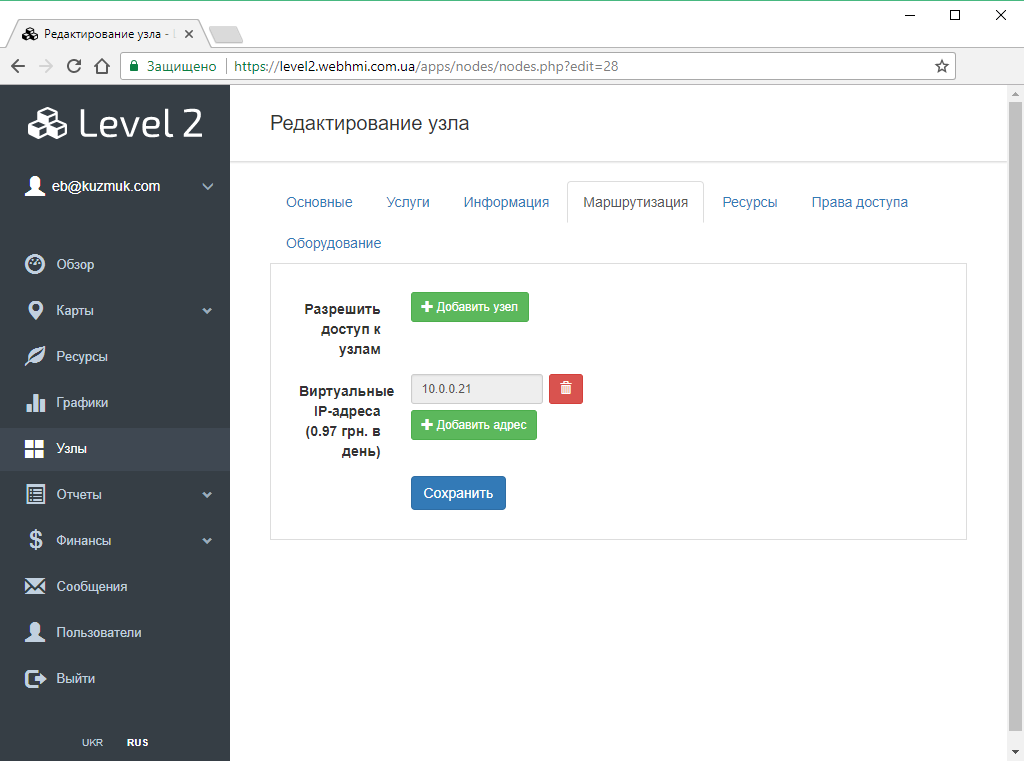 In the WebHMI / Virtual IPs tab, add a 'virtual' address from the VPN network (an additional address allocated to the end devices you need to access).
</p>
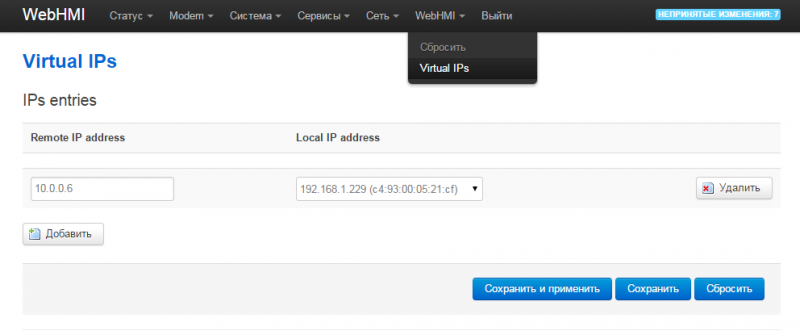
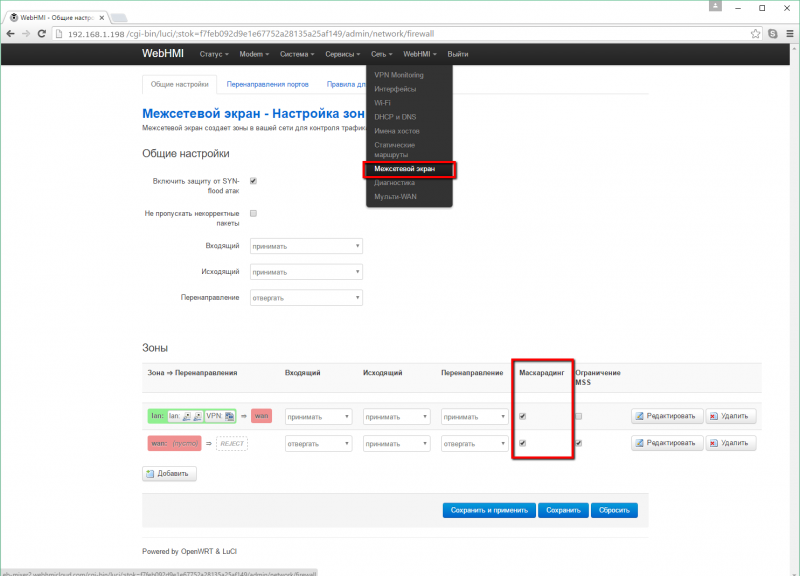
After adding this address, the rules for translating the virtual vpn address data to the actual addresses of the end devices in the WebHMI LAN subnet will be automatically generated. You also need to set up a masquerading for the LAN zone.
For our u-remote example, this is the address 192.168.0.210. Then, to configure the u-remote device via a web browser (u-remote has its own web interface for configuration), it is sufficient to specify its address from the WebHMI VPN.
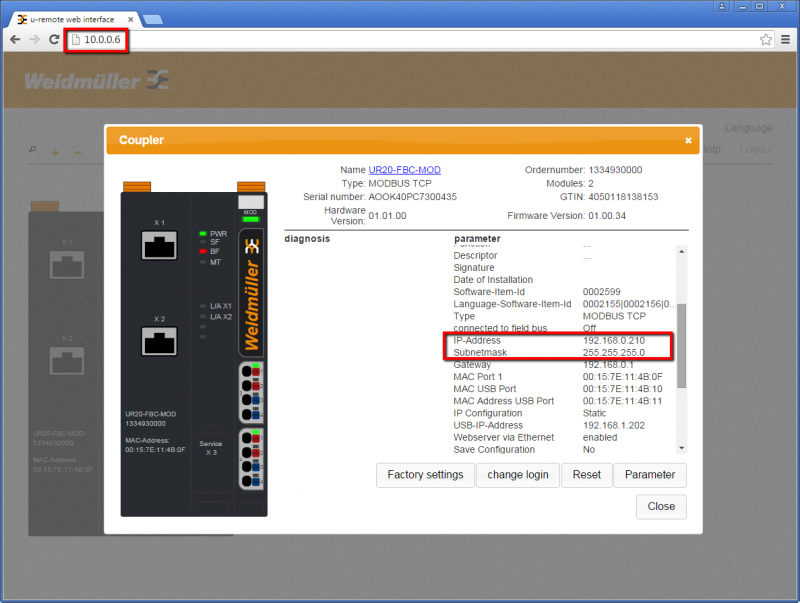
Similarly, it would be possible to program remotely the PLC and other automation devices with an Ethernet interface.
Establishing communication with remote devices behind the gateway via a virtual COM port
System structure for this mode is given below:
Please refer to this [Setting up virtual COM port].
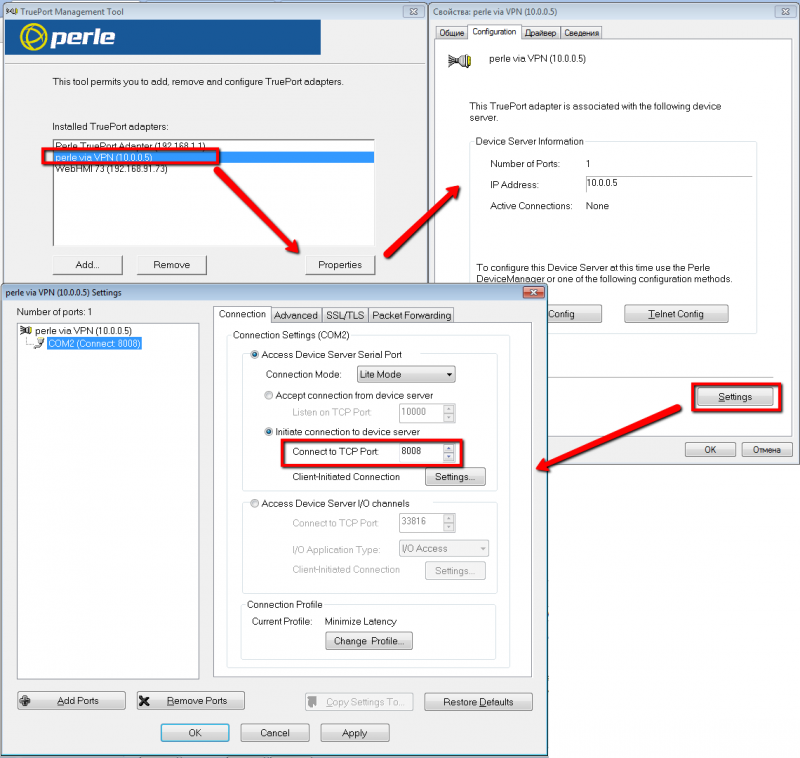
As an IP address, you need to specify the WebHMI address in the VPN network, for example 10.0.0.5, and take the TCP port number from the connection settings in the virtual com port mode.
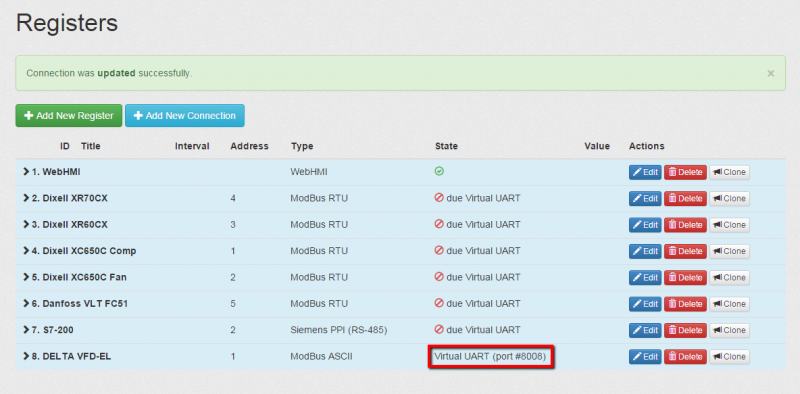
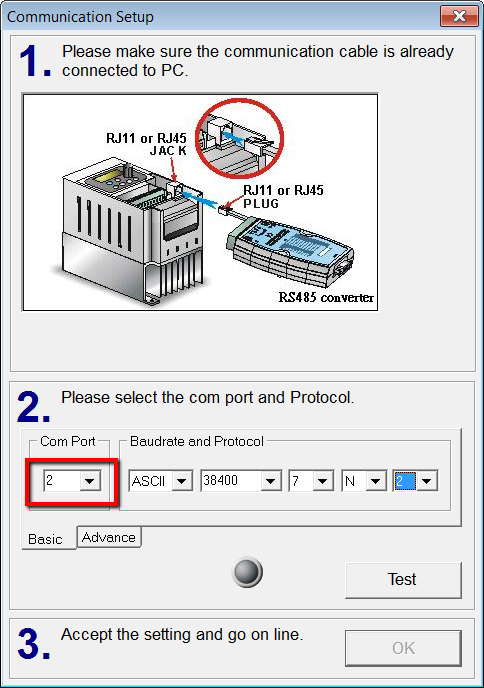
After that, you can use the drive configuration utility via the COM port, specifying the virtual serial port number created on the computer.
Connection settings via the COM port to the frequency converter:
Пример настройки проекта TIA Portal V13 для ПЛК Siemens S7-1200 (доступ через Ethernet)
Для того чтобы можно было подключаться к ПЛК из TIA Portal, необходимо перед подключением модифицировать в проекте сетевые настройки контроллера.
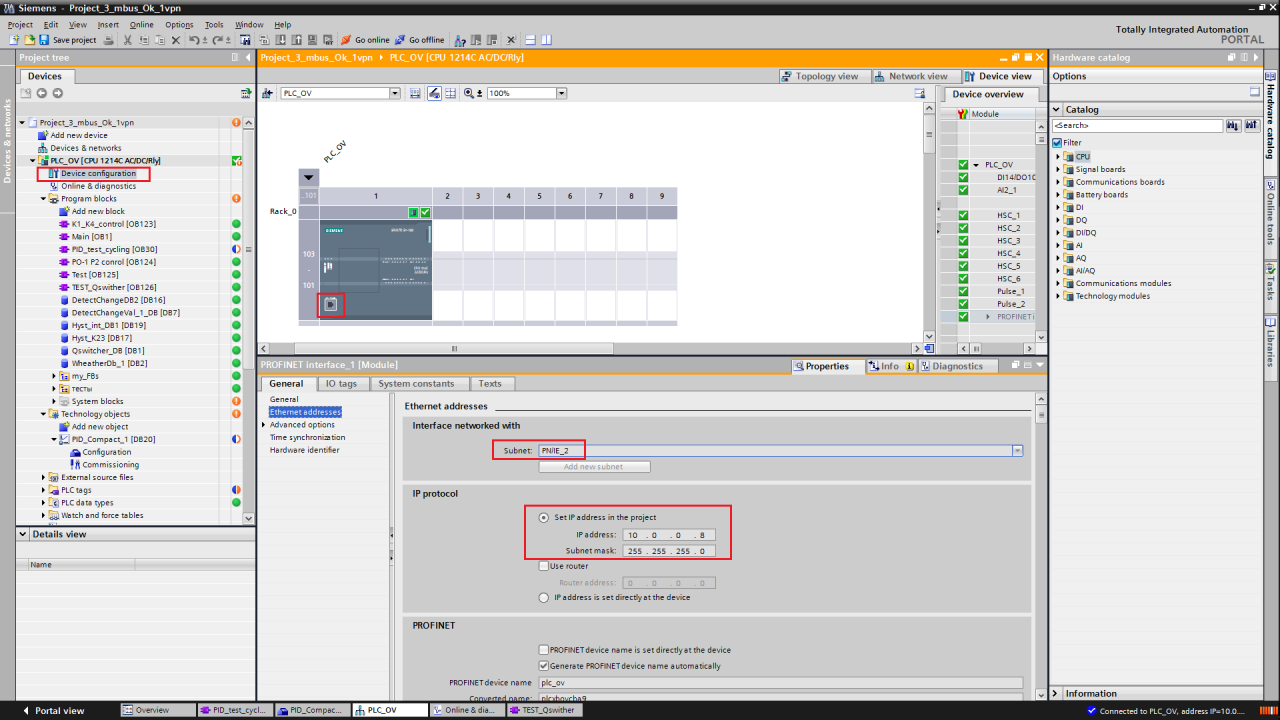
- 1. Необходимо перейти в меню Device Configuration и создать дополнительную подсеть для VPN - подключения, а также указать выделенный виртуальный IP-адрес для ПЛК в проекте.
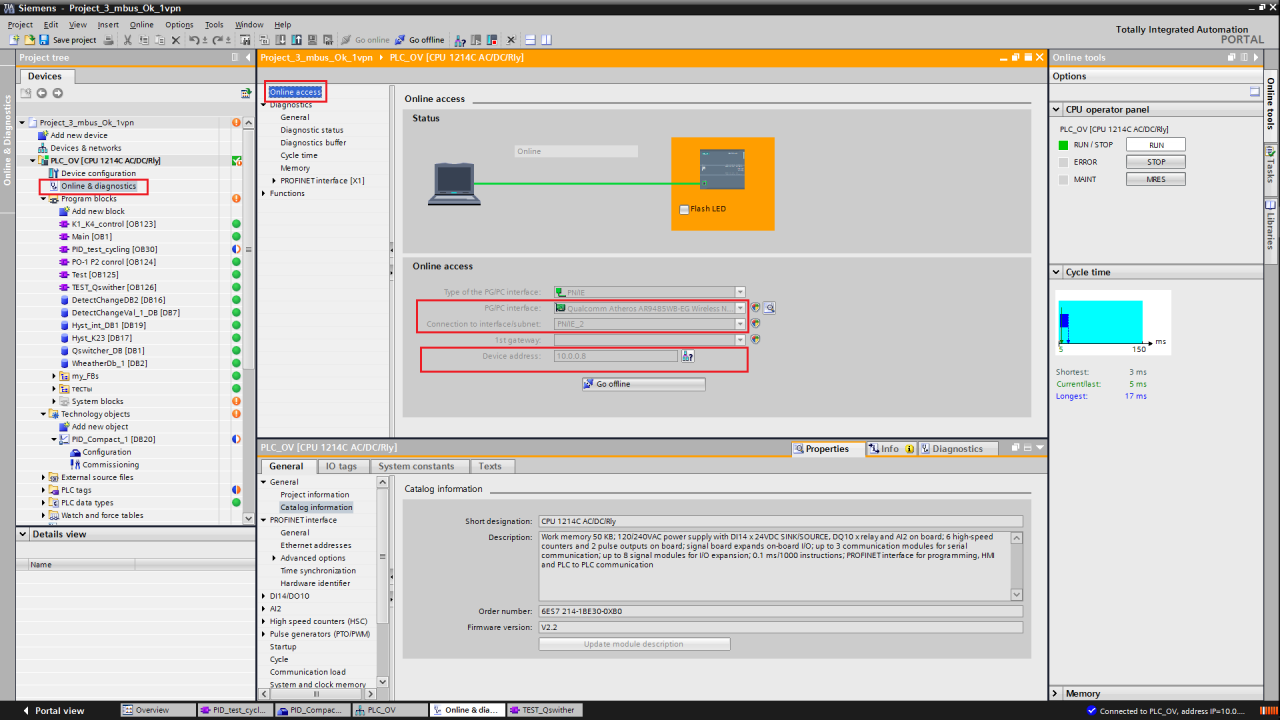
- 2. Затем при подключении через меню Online & diagnostics необходимо указать эту подсеть и адрес ПЛК для подключения.
- 3. При внесении изменений в проект, не нужно записывать в ПЛК измененную аппаратную конфигурацию, только изменения кода, иначе ПЛК потеряет связь (поскольку изменится адрес его сетевого адаптера , указанный в правиле трансляции адресов)
Пример настройки проекта Step 7 Micro/WIN для ПЛК Siemens S7-200 (доступ через последовательный порт PPI)
Для того чтобы можно было подключаться к ПЛК S7-200 для удаленного сервисного доступа необходимо:
- 1. Убедиться в наличии связи WebHMI c ПЛК – т.е. есть настроенное соединение и читаются регистры ПЛК
- 4. Подключить ПК с Step 7 Micro/WIN к этой же сети VPN см. здесь, проверить, что есть доступ к WebHMI по адресу из подсети VPN, есть ping, броузер заходит на стр. с этим адресом – например для вышеприведенного рисунка это 10.0.0.5
- 5. Настроить виртуальный ком порт на ПК – см. здесь. В качестве IP адреса нужно указать адрес WebHMI в VPN сети, например 10.0.0.5, а номер TCP порта взять из настроек cоединения, находящегося в режиме virtual com port
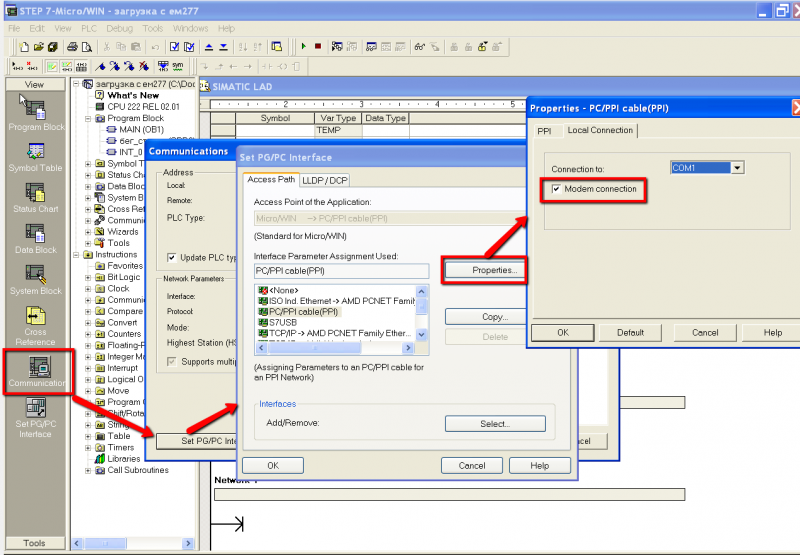
- 6. Настроить модемное соединение с ПЛК в проекте MicroWin Step 7
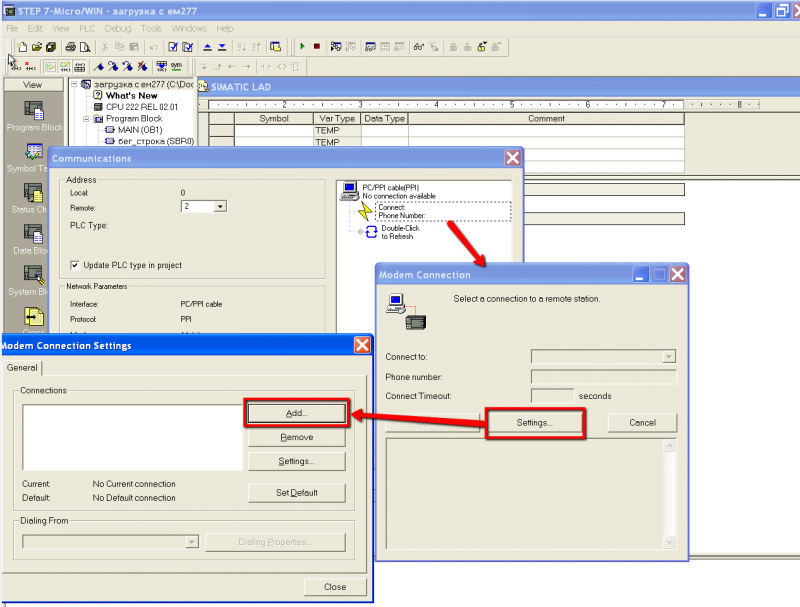
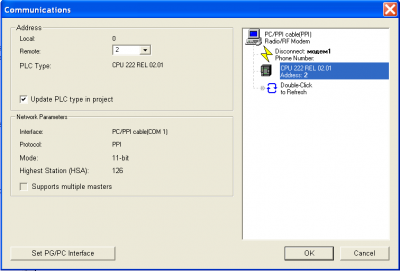
- a. В разделе Communications настроить PPI соединение через созданный в п.5 СОМ порт, используя модем
- 6. Настроить модемное соединение с ПЛК в проекте MicroWin Step 7
- b.После этого в окне подключения надо нажать Connect Phone Number для подключения к модему; поскольку его нет, то нужно добавить модем
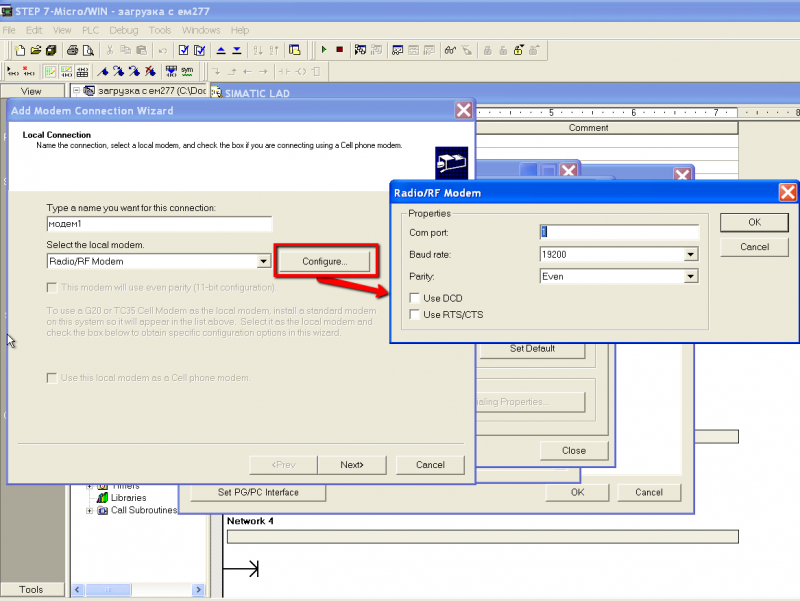
- c. Указать настройки модема
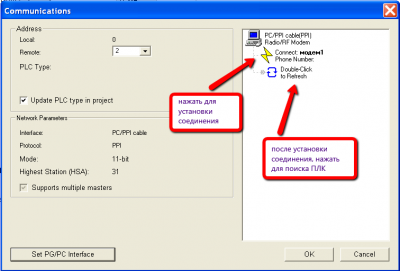
- d. После установки модема окно установки связи должно выглядеть так:
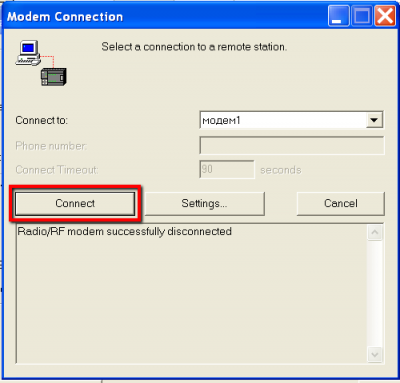
- e. Нажать Connect Phone Number , затем Connect для настроенного модема
- f. После установки соединения окно должно выглядеть так:
